Interior Decorating and Design Studio (Locust Valley, NY) Interior Decorating and Design Studio (Locust Valley, NY)

Blog

One Room Challenge, Week 8 FINAL REVEAL

One Room Challenge, Week 8 FINAL REVEAL

Updated: Jan 2

Welcome to the final, Final! The end of this challenge was really tough for me to get through. Between the usual shortages and delays (are we sick of saying that yet, or what?!), work being in full swing, and getting sick, completing this room felt like going through molasses. But I prevailed, thankfully! Read below for details.

A special thank you goes out to F. Schumacher for partnering with me on this project. I used their Arborvitae print for my game table chairs, bullion trim for my sofa, and tape for the window treatments.

Fabric for shades, game table seats, and trim for the couch

PAINT

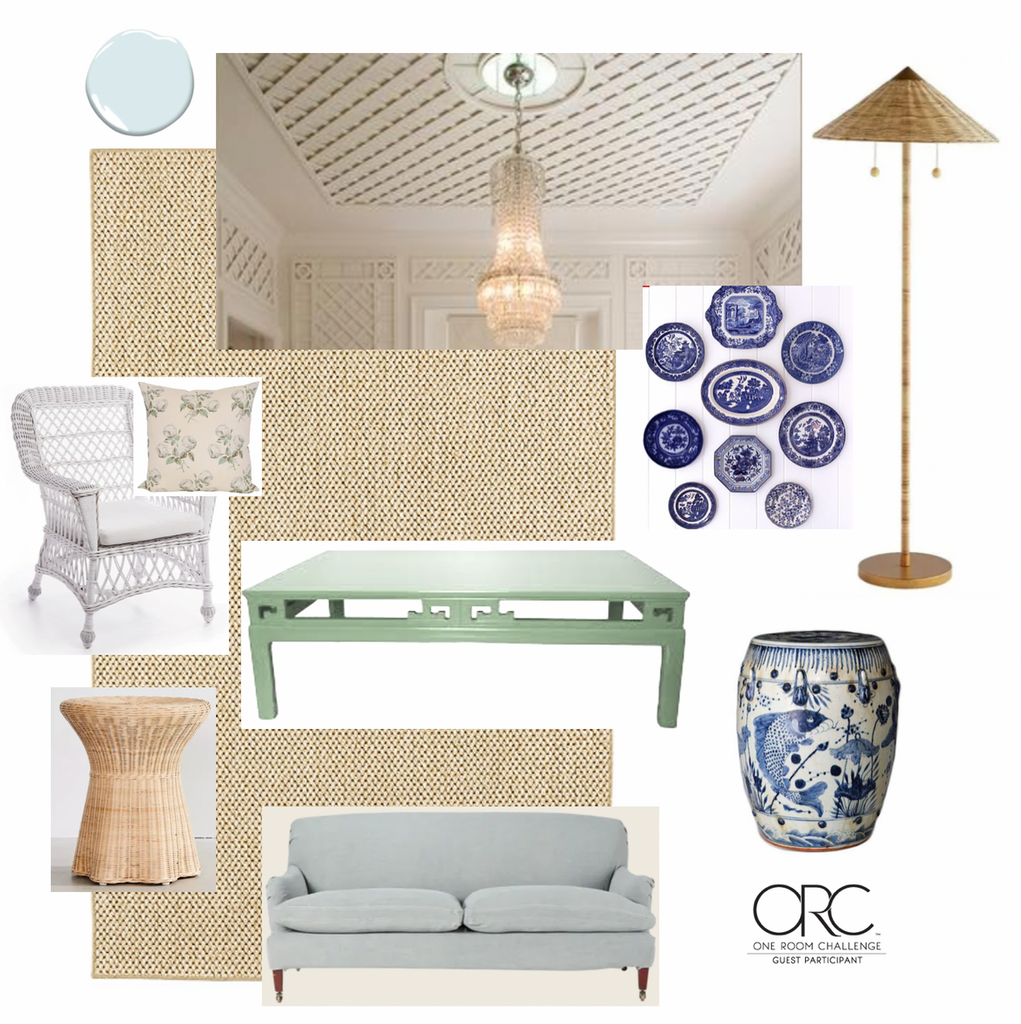
The paint is called Glass Slipper by Benjamin Moore. It's a really soft blue which gave me the subtle pop of color on the ceiling that I wanted. Just like looking up at the sky. We did the ceiling in a semi gloss, and the walls in a flat. The walls are Decorator's White, and the lattice is a high gloss finish of Decorator's White.
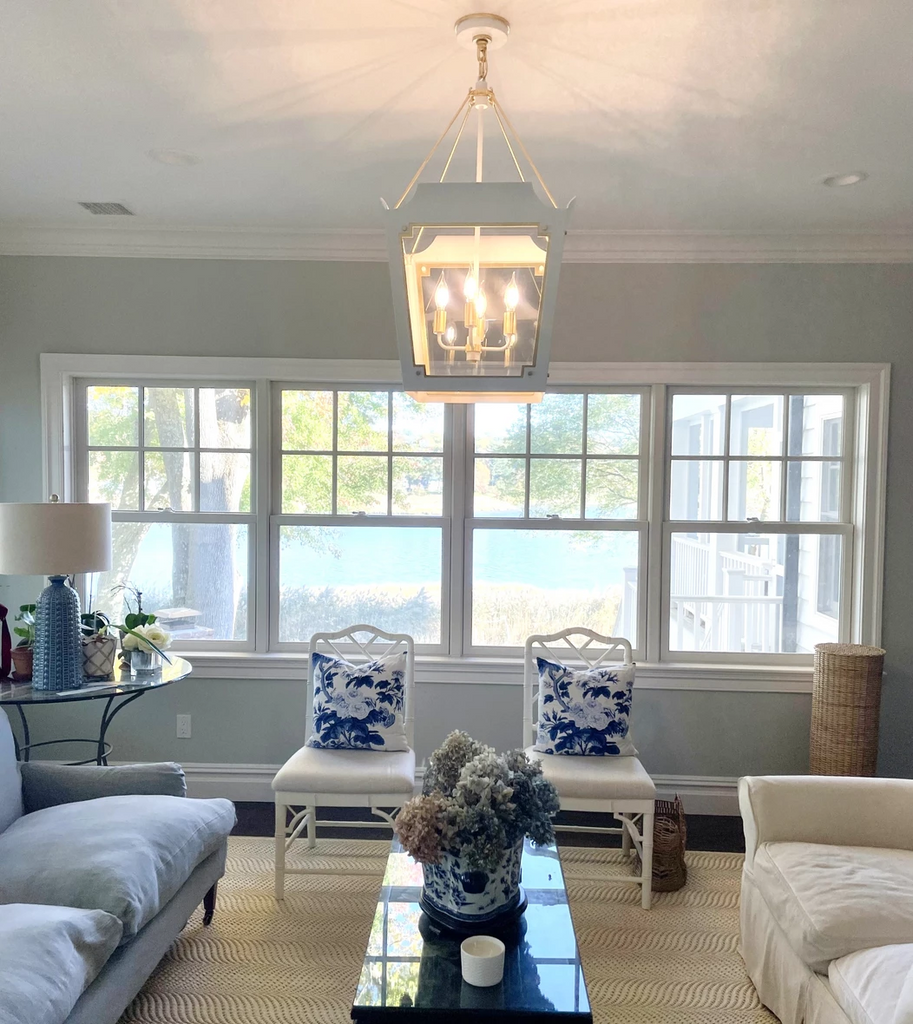
LIGHTING

The chandelier lantern is by Visual Comfort called Caddo, in size medium. I love it for the white color and the touch of brass. It is such a nice balance of elegance and fun for this room. A traditional piece, but with some modern lines.
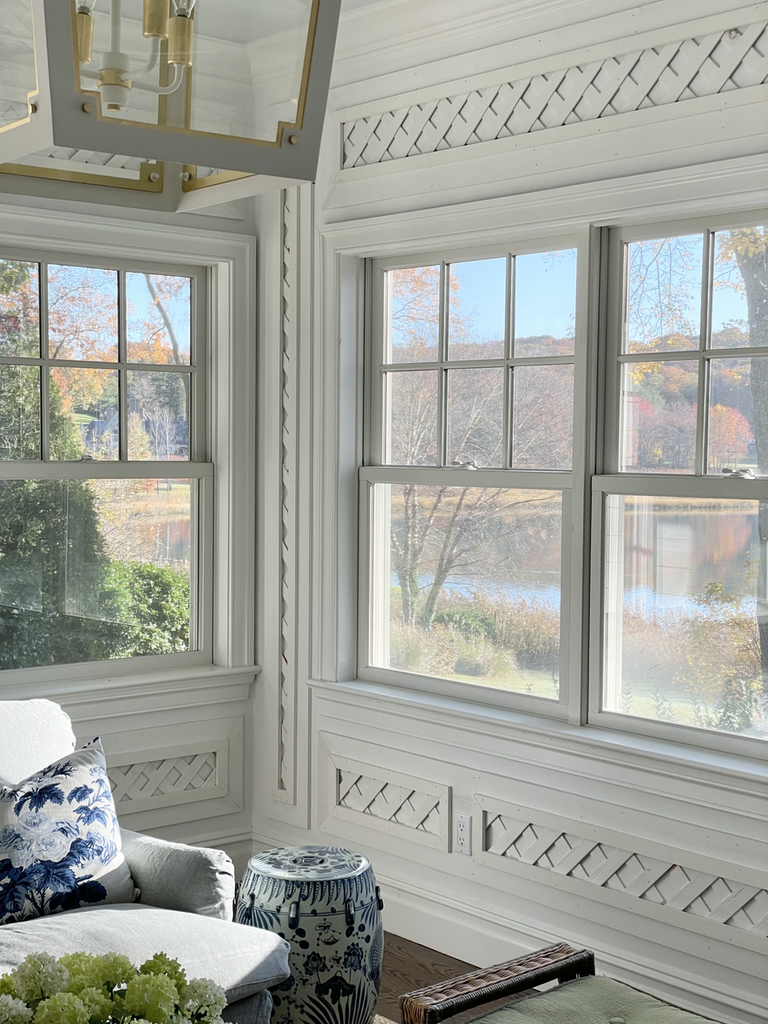
Let There Be Light

LATTICE

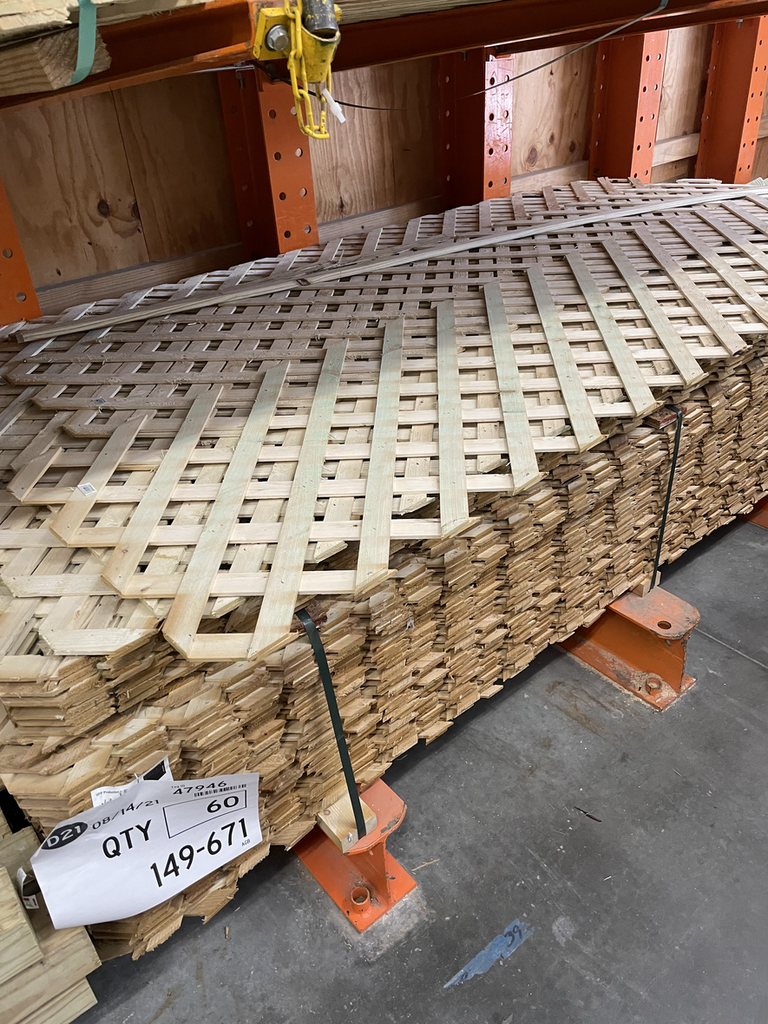
I had hired someone to come and put the lattice on the walls, because I had trouble finding the time. You can read all about it in my Week 7 Lattice post. The short story is that we painted good quality cedar lattice, then built boxes on the wall for the lattice to fit inside. The lattice was tricky to cut because even though it is good quality it is still somewhat fragile. We took a smaller trim piece to cover the edges of the lattice within the boxes. It came out FABULOUS! I am so happy with. my decision to put it on the walls and not the ceiling. It really makes the statement I wanted, without being too "Grand Floridian"-which was a term coined by one of my clever followers.
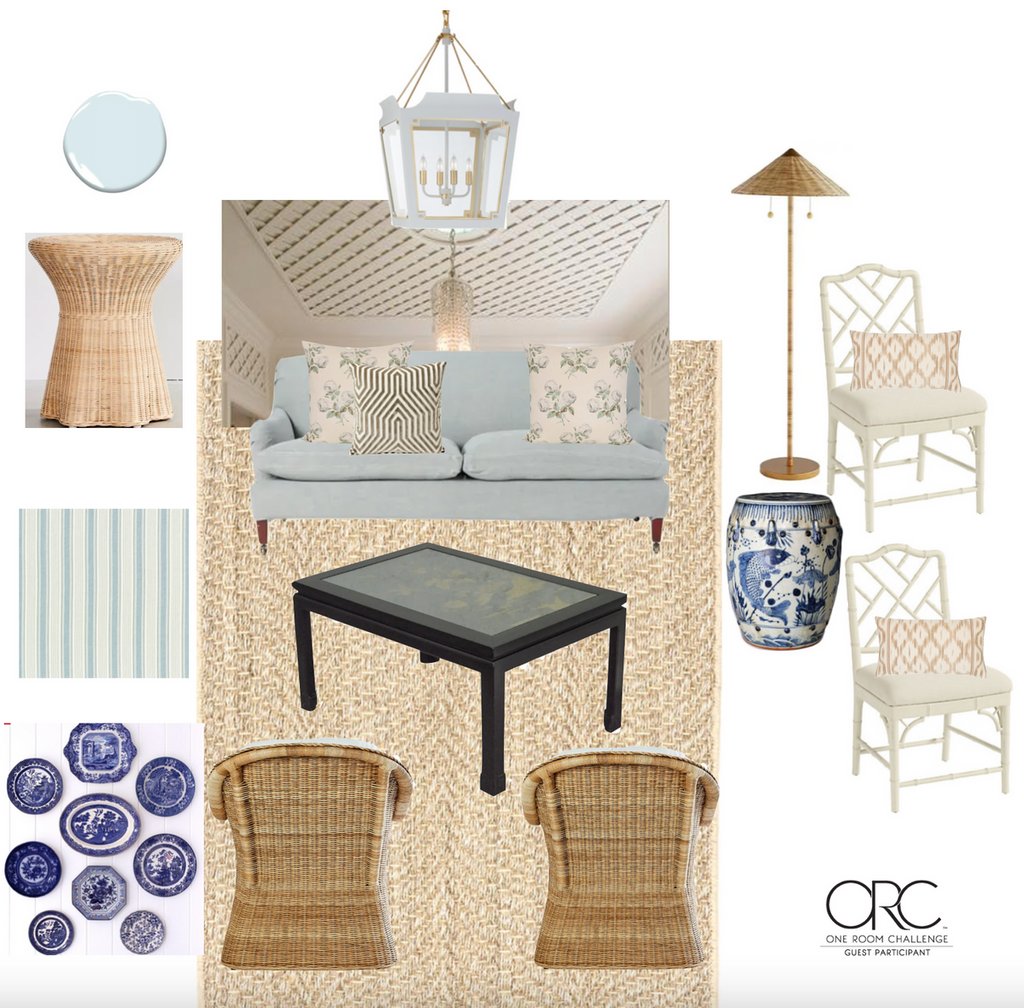
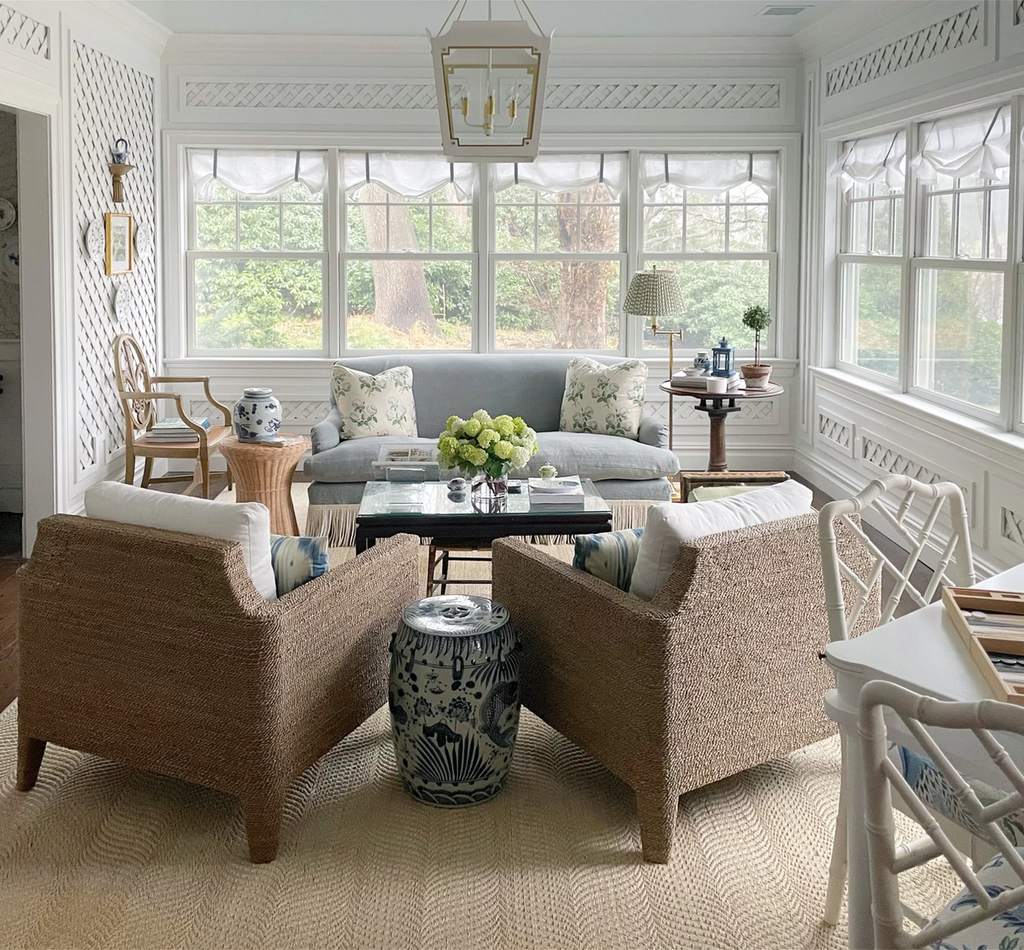
Mid lattice work, fitting the lattice in the frames


RUG and SOFA

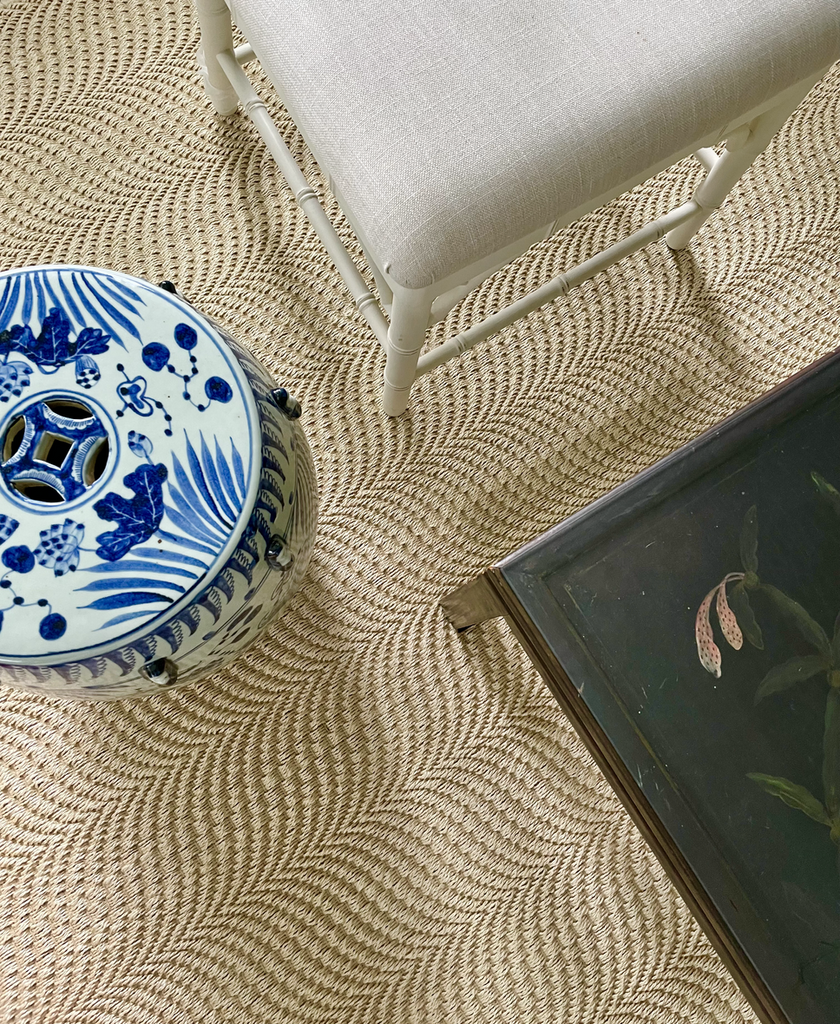
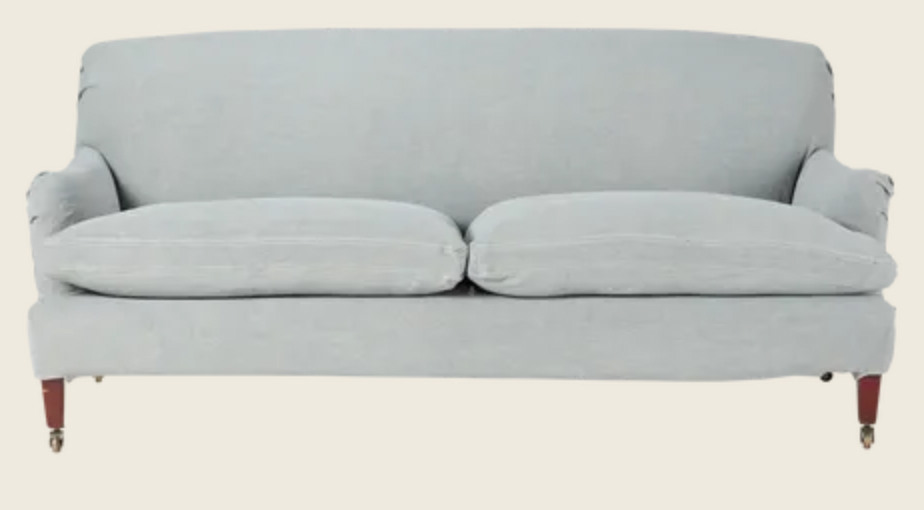
The rug is an Annie Selke gem that is a fun spin on a regular sisal rug. It has a wave pattern that was just so irresistable for me. While I do love myself a fun rug with a great print, I really wanted the walls to speak for themselves so a sisal rug was a great choice. The couch is from OKA and not only did I love the cornflower color, but it's a slipcover so I can wash it. Which is great because the dogs already love to sit on it.

The slipcover sofa, pre bullion trim
OKA sofa with Schumacher bullion trim I added

TABLES

Coffee Table

The ming style coffee table was a truly remarkable find. It was my grandparents. It was sold when they had passed and I never saw it again. All these years later I came across someone who had it and knew it was from my family's home. He gave it up for me and I picked it up that week and brought it home. It was unbelievable to find this, much less during a time when I actually really needed it; The One Room Challenge. they had a piece of glass fabricated, which I kept to preserve the hand painted Chinese flowers on the top.

Ming Style Coffee table, that was my grandparents

Game Table

I knew I wanted a game table to bring the family together. This one paired nicely with chairs I already had. I have so many childhood memories playing backgammon and I wanted that for my kids as well. Find the backgammon board here.


Game table, perfect for family time

Side tables

On one side of the sofa is this wicker side table, of the sweetest size. And the other is a family heirloom from 1730-a Queen Ann tilt top table.

WINDOW TREATMENTS

These are no sew window shades with Shumacher tape. I wasn't sure how I would like window treatments in the sunroom but it looked empty without them. Not sure how temporary these will be but for now they are casual and relaxed-which is just what I wanted. Especially with the white linen.

ACCESSORIES

One of my favorite accessories for the room is this Visual Comfort floor lamp with a shade from The Shade Shop. Changing the shade allowed me to add more green to the room. I also love the Pierre Frey Toile de Nantes pillows from Designer Mod Pillow Shop, on the chairs. The blue looks great with the game table chairs. And it pairs nicely with the garden stool.
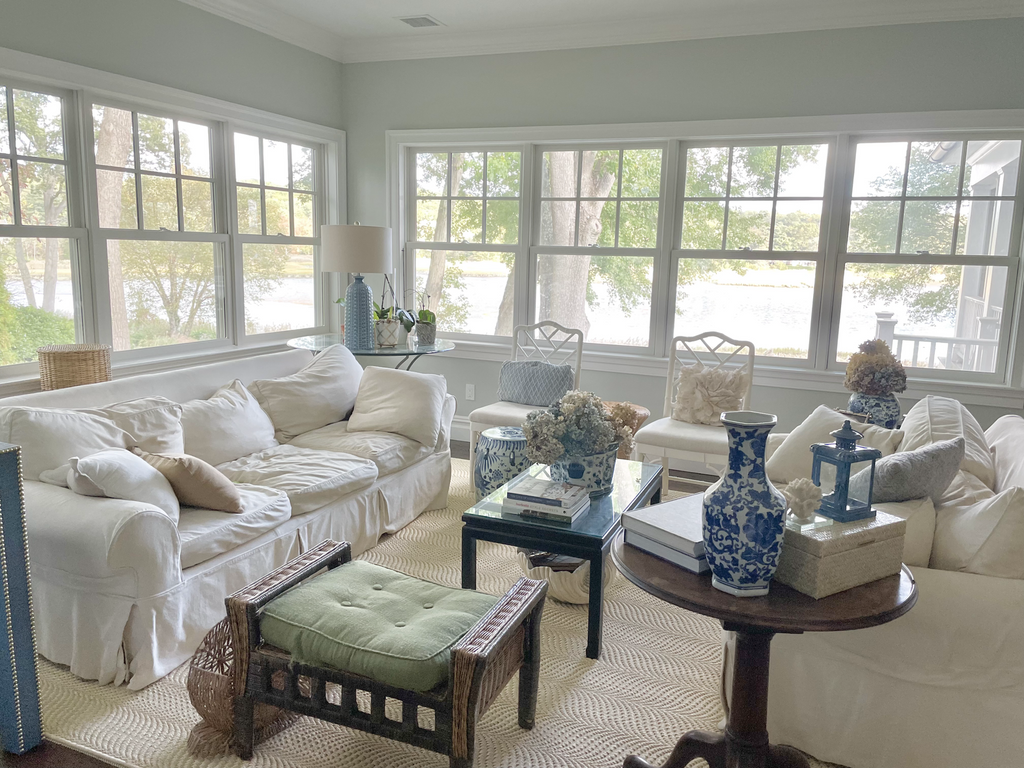
Colefax & Fowler pillows and Fermoie shade
Club chairs with Pierre Frey Toile de Nantes pillows
Willow & Pearls tassel plate sconce with Royal Copenhagen plates

BEFORE

As with any project I do, I always take a before photo. This clearly reminds me of how much I love the room now, and how much I really didn't like it before. Many of you have seen this room, and in fact I know a lot of you loved it the way it was. But the truth is, it just didn't feel like me. We made old furniture work for the space to buy us some time, so after awhile it looked frumpy to me. But ultimately we needed a redo so that we would actually spend more time in there. And I wanted a more creative and one of a kind approach.

B E F O R E
B E F O R E

You can check out some of the reveals here from the guest participants. Thank you for hanging on with me, I hope the reveal was worth the wait! I put a lot of heart into it and I can't wait to spend time with my family here now. xx-Chrissie

Continue reading

One Room Challenge, Week 7, Lattice

One Room Challenge, Week 7, Lattice
 
Eureka! The lattice is up. And I am so excited to share it with you, while hoping not to reveal too much before the final, final. Along with sharing the process with you, I also want to share an important message, which I think is more important than the lattice itself.
 
When I started the One Room Challenge in the Fall of 2020, I told myself I wanted to do some things on my own and my husband thought I was nuts. Because I didn't have the time and some things were better left to the professionals (wait, I'm not a professional? j/k). Fast forward, I did a lot of it on my own and felt so proud. For this challenge, I wanted to do the lattice work myself, because I knew I could. Determination was all I needed, and I had it. This time around my husband convinced me to hire out to get all the cuts just right, and so I could focus on my interior design clients. It felt like a stomach punch to have someone else do this project because I thought I wouldn't feel as proud. But you know what, I love how it came out and I have to move on. The pressures of social media has us feeling like we either have to spend a lot of money to get things looking magazine worthy OR we have to suck it up and do it ourselves when maybe our time is better spent elsewhere. I decided my time was better spent elsewhere...with my clients and their projects. And I am here to tell you that whatever you decide to do with your time-have it mean something in the end. And do not feel guilty! If a DIY is over your head, don't drown yourself in it.
 
Phew, now on to the lattice. I ended up purchasing a better quality cedar lattice because I didn't want to skimp on the quality. It turns out that it took the paint much better and looked exactly how I wanted it. Moral of the story is if you want some temporary fun in a small space, while saving money, get your lattice at Home Depot. They even have a white vinyl option. If you are committed to a design in a space that you frequent, consider purchasing good quality lattice or finding online options.
 
The first step was measuring out the boxes that the lattice would go into. This required some framing around the outlets and getting a little creative around the Nest system we have. We used 3.5" x .5" of wood to surround the lattice.
After the boxes were built the lattice was cut to fit inside. So each piece ended up being custom because none of the boxes are the same. This allowed me to really choose which lattice pieces looked the best and which ones made the cut for the room.
 
After the lattice was nailed into the wall, smaller trim pieces were used to cover the edges of the lattice. This created a final, clean look, with no loose ends.
We painted the lattice in a semi gloss so it pops against the flat wall paint. However, after all the trim work, we still have to go back and do touch ups over the nail holes. And still have to get the textiles in order. Ahh, tick tock!
 
Thank you for reading and I hope you have enjoyed this process so far. More to come with the final reveal, and as always, please check out what the others are up to by clicking here!
 
Continue reading

One Room Challenge, Week 6 Gloss is Boss

One Room Challenge, Week 6 Gloss is Boss
 
This is the first week I have felt such progress in my sunroom. And I'm so glad because we only have a couple of weeks to go.
 
The couch finally arrived and I love the color. It does take a little bit of finessing to get the slipcover to fit right. Still figuring that out. I am waiting on 2 wicker chairs that will sit across from it, and the game table.
 
The lantern chandelier came and we were able to get it wired and up on the ceiling. It totally makes the room and I am really happy with the style and scale. It has nice lines and pretty white and brass details.
 
I had a change of heart on the lattice. I ditched the Home Depot lattice pieces and got real cedar lattice at a lumber shop. It wasn't cheap in comparison, but I think I will be better off in the long run.
 
I picked the privacy screening, the one in the middle


The room and the lattice was finally painted. I decided to go white on the walls and white on the lattice-but using different finishes. I chose to paint the walls from Gray Owl to Decorators White. And here is a sneak peak at the ceiling, in all it's shiny glory! It created such a jewel box moment for the room because we used a semi gloss finish. More to come on this!
 
An Alfred Hitchcock moment
A sneak peak at the ceiling
I have to figure out textiles and window treatments, and that's all coming up this week. I have my eye on a Schumacher stripe, and I'd love to incorporate it. But I also have to get some green in here too, so this week will uncover all that.
 
 
Thanks for reading! And go check out what others are up to by clicking here. Only a few days left!
 
Continue reading

One Room Challenge, Week 5

One Room Challenge, Week 5
 
This week was all about the lattice. I needed to sit down and have a long, hard talk with myself about the execution of this project. It turns out that while I wanted to get this done myself, it's better to call in reinforcements. So that is just what I did.
 
I am still going to be sanding and painting the wood, but I called a local craftsman who specializes in trim. I recently decided to put the lattice on the walls and not the ceiling, which narrows down the work. And instead of putting lattice on all the full wall space, we are framing it out in picture frames (see inspiration photo below);
 
Design by Clary Bosbyshell
I am still deciding if I want to do white on white like the photo above, or if I want a color behind it on the wall. Either way I need to paint the wall and that will also be happening this week. I am loving the idea behind the photo below;
 
Design by Ashley Whittaker
This week I decided to also get a game table for the corner of the room. This will be for backgammon (a game that my family always played), puzzles, and cards. I am looking on facebook marketplace to score a winner. I may be able to find one on consignment. If possible, I could get this table to double as a test during the day because the views would be fabulous while I am working.
 
A lot of things will happen this week; couch delivery, paint, ceiling lighting, and the beginning of the lattice treatment. Next on my plate, will be doing my own roman shades with a little bit of help from my workroom. This week was a little bit slow but the next 3 weeks will likely be nuts. I will love having this done for Thanksgiving, so I have to keep my eye on the prize.
 
Arrives Wednesday, I hope!
Thanks for reading! And as always, feel free to see what the other Better Homes & Gardens ORC contestants are up to.
 
Continue reading

One Room Challenge, Week 4

One Room Challenge, Week 4
A live look at the room in it's current state
Oh no! Week 4 means we're half way there and I feel like I have so much to do!
 
I unwrapped the rug and it's sensational. I am so happy with it. The sisal really gives the space the "sunroom" feel I wanted. And it's a lot bigger than my older rug, which makes the room appear so much bigger. We repurposed the old rug from our previous home but the reality is that it was way too small. By having a rug that reaches all the walls, with about a foot of space in between, the room started to feel substantial.
 
 
I ordered 2 chairs, with ottomans, to sit across from the blue couch. I hope they will arrive in the next 2 weeks. Unfortunately the cushions for them were on delay so I will find a way to make new ones. I'm thinking about recovering regular dining seat cushions, for now.
 
 
I am hoping to get this light in. I think it will really make the space! But I only have recessed lighting in this room and it will be a little bit of a job ($$$) to get a chandelier up. But here is my dream lantern, and I will hopefully be able to hang it on the shortest loop so it doesn't get in the way;
 
As for the elephant in the room-the lattice-I am having second thoughts on it. I am thinking about calling in some reinforcements. And I am wondering if I should put it on the walls instead, and then paint the ceiling blue. Hmmm... Time is ticking! But that's the great thing about this challenge. If I didn't have a clock ticking, it would never get done. So here is the latest of how it is evolving, and wish me luck!


And if you'd like, check out what the other contestants are doing by clicking here.
 
That's all for now. Hoping to make big strides this upcoming week. Thanks for reading! -Chrissie
 
Continue reading

One Room Challenge, Week 3 "An Unexpected Surprise"

One Room Challenge, Week 3 "An Unexpected Surprise"
Coming Together
In past Better Homes and Gardens One Room Challenges there have been weeks I accomplish a lot, and weeks I don't accomplish anything. This week I didn't get much "work" done. But I did get some goodies in the mail, and one special surprise. I'll start with the surprise because it's just so good.
 
My grandparents table, finding it's way back to me
In 2013 when my grandmother passed away, a few years following the death of my grandfather, I had the opportunity with other family members to take a couple of things from the home that were meaningful to us. But at the time I lived in a small home. I only took a couple of things that were really important to me. The rest of the items were given and sold through an estate sale and similar avenues. Fast forward 4 years later to building our home, I of course wish I took more, but couldn't. An antique dealer in the area recently shared with me that he knows where a couple of items were that I could buy back. Wow! Really? Someone's parents had my grandparents coffee table, and I knew it would be perfect for my sunroom! They graciously offered to return it to a family member and I arranged for pick up. And it's here. The exact table. And I remember it like yesterday.
 
The table is an Asian inspired ming style coffee table from the 1940's. What makes it special (other than the obvious) is the top of the table. It is hand painted with beautiful flowers and lily pads, indicative of the time period and it's origin. I had wanted to lacquer my own table for the One Room Challenge, but now that this has entered my home, I will undoubtedly be using it. And having a black item in your home grounds just about any space. I'm so into it! To be surrounded by special items in my new sunroom will hopefully make it fabulous.
 
Next up I received the blue and white garden stool which I will use either as an end table or in between 2 club chairs.
Blue and White for an end table in the sunroom


My Annie Selke rug arrived but I haven't unrolled it yet. I hope it's good!
Sneaky Peaky


I purchased the couch according to plan and I really hope it arrives in the next couple of weeks so I can start to space plan. I have my ideas mapped out on paper but I still don't have club chairs so the rest will be determined at a later date.
 
The couch I ordered


And last but *certainly not least* I started painting the lattice that will go on my ceiling. Boy is it a job, and that's all I will say about that! If I can persevere on getting this up on my ceiling, I think it will be really awesome. More next week after I ice my arms and shoulders.
 
Lattice, painted in Decorator's White


More next week, and be sure to check out what some other contestants are doing!
 
Continue reading

One Room Challenge, "Lattice Pray", Wk 2

One Room Challenge, "Lattice Pray", Wk 2
This challenge is already rearing it's ugly head! My client work load became a lot to balance this week. And my clients always come first. But I do want to set aside time for myself to complete this space that I have been dreaming about. Because nothing gets a room done faster than having guests come over, OR participating in the Better Homes & Gardens One Room Challenge. This week I started the lattice, and I need prayers! So Lattice Pray...
 
A couple of weeks ago before the ORC started, I went to my local home improvement store to start to organize the lattice for the ceiling. Before I committed to this design, I needed to know if it was a possibility, and I have no idea how hard it will be. So there was no wasting time to at least get started. I want the lattice to have white, or a very soft and subtle blue color underneath on the ceiling. So it's paint, and lattice work. Time to get started!
 
I found 2 kinds of lattice, one vinyl and one wood. While the vinyl was already white and seemed really crisp and clean, it just wasn't the look I was going for.
 
I want to do my very best job to get the look I want and I do not want cheesy in my life. So I found some pressure treated wooden lattices which were exactly what I wanted. They had two sizes, 4'x8' and 2'x8'. I thought the bigger one would be harder to work with, so I went with 7 pieces of the 2'x8'. I will need to sand and buff out some of the splintered edges, and will need to use some wood filler for the holes. They will be perfect. The hard part will be getting them up on the ceiling and lining them up nicely!
 
 
I received a couple of messages as to why I wasn't going to get the lattice professionally done. Okay, I'm lying. I got like 30 of them. To be honest, I am not a real DIY person. I hate when DIY's fall short and I would never even dream of doing this for a client. But when I researched these rooms, unless it was Accents of France, it really was essentially garden fencing. So if I can make the wood like really good (clean it up, sand it, fill in the imperfections...) I think I am good to go. After all of this work, I'll be damned if this falls short. I am confident!
 
Lots of sanding to get the splintered edges out
Added wood filler, and sanded it flush
I am scouring websites for second hand furniture. It isn't important to me to have everything brand new, but it will be a mix. So I am searching high and low. And the clock is ticking because I need to reserve time for shipping, and delays. I need to find a couch, and I like this one from OKA. And two accent chairs-eeks! Hoping to incorporate some wicker and rattan for a super chic but comfortable sunroom. Fingers crossed!
 
That's it for week 2, I hope to have more progress by next week! If you'd like, go check out what the other ORC participants are up to. Ciao!
Continue reading

One Room Challenge, Week 1

One Room Challenge, Week 1
Guess who's back for the One Room Challenge?! Heyyyy!
I am so excited to transform another space in my home. Completing the Better Homes and Gardens One Room Challenge last year was no easy feat in the height of shortages and delays. But I enjoyed it so much and we had such a good time along the way. This season, we are using the full 8 weeks to transform my sunroom.
 
THE SUNROOM
I know what you're thinking, "why are you doing this? It looks done already". But the truth is that the room is starting to look a little tired. And the furniture is old, and the rug is ready to go. AND IT IS STRESSING ME OUT! And I don't need that in my life. It needs a "zsush". And I want a more fresh and collected approach to the sunroom. I will be keeping some of my current items, and purchasing new (or second hand) items, all with a little DIY along the way.
 
THE PLAN:
Design Plan, ORC Fall 2021


This quick little mood board showcases the plan for this room. While we are still seeing lots of delays in the design industry, I am hoping to do a very close variation of this. And I am hoping to find some really unique pieces at some of my local consignment shops (because buying second hand is cool and great for the environment). I want this space to feel like ME, which is surely a blend of old and new. I love that mix! If I can incorporate a chaise lounge chair, I would love that in this space. So this is clearly a 'moving target mood board'! And I'm okay with that because I have had to pivot with almost every space I have designed these last several months. One foot in front of the other, at all times.
 
INSPIRATION:
 
Design insp, via The Glam Pad
I would be remiss not to share what is inspiring me for this room. When I came across this photo I just thought to myself, "That is a sunroom!" And I want to emulate that same feeling in my house. Layers, texture, interest...I want it all.
 
SOME DIY:
Okay let's discuss the elephant in the room, shall we? What is that on the ceiling in the mood board? It's called Treillage and it's inspired by 18th century French Architecture. Think beautiful garden arbors, but for your interior (and in the most elegant way). I will be customizing my own piece of treillage and here I am back in 2021 doing more work on ceilings. If you missed it last year, I spent a lot of time adhering bamboo to the ceiling of my dining room during the Fall 2020 challenge. I just can't get enough of hours of looking up on a ladder, and subsequently lots of neck pain. See what I'm talking about, below;
 
Bamboo Ceiling, ORC Fall 2020
THE BEFORE
No ORC is complete without a good before photo.
 
The sunroom, "before"
I am ready to take this on so that I can have a place to retreat to. A place to enjoy the sun, without a TV and without noise from every day life. A place to enjoy the water views. And if all goes well, it will have the ceiling of my dreams :) And while I have you here, it is fun to take a look at what the featured designers are doing. Plus many other designers and bloggers that are taking part in this event. Take a look here. Thanks for following along! -Chrissie
Continue reading

So, You Want to Build a Pool?

So, You Want to Build a Pool?
After 2020 and 2021 stared us square in the face and said "not today junior" many decided to take it upon themselves and get their own pool at home. With some beaches closed for most of quarantine, and people in and out of sheltering in place, it is a great problem solver. It occupies children, and allows you to build a place you never have to...gulp...leave! With summer almost coming to a close, and delays still very much a part of reality, this is a great time to get your plans in place so you are ready to go next year. Here is what you need to know if you are considering putting a pool in.
 
 
RESEARCH
Researching pool companies is undoubtedly where you start in your process. Google is your friend. Start researching and calling around to get a free consultation. Ask your friends and neighbors for referrals, if they had a good experience. Pool companies will be able to tell you right off the bat how long it will take them to get to the construction phase of your project. There will likely be a wait list. But if you play your cards right this fall and winter, you could be all set to break ground in just a few short months.
 
PERMITS
Though permits and procedures for a pool vary from state to state, and county to county, it is required that you get a permit before you start building. You can apply for the proper permits on your own, or ask your pool contractor to help you with this. Most oftentimes the permit process requires you to submit documents by filling out appropriate forms and submitting the projected pool design, accompanied by a check. Once you are approved for your permit, you can begin building. Once the pool is completed, it will need to be inspected to be sure it is up to code (safety, fencing...). Then the permit can be closed.
 
STYLE AND DESIGN
In order to get your permit your town or city may want to know the pool design. Where will it be? How large will it be? How close is it to your house or your neighbor's house? This is more for safety and code purposes, and less for design. While you are working on getting your permits you should talk about the length of pool you want, shape, and gradient. If you want a diving board, the pool must be a certain depth in the deep end. Having the answers to all of these questions will help you go through the building process smoothly.
 
 
Vinyl or Gunite
Deciding between how you line and build your pool may come down to price. Vinyl is most cost effective compared to gunite.
 
Pros Vinyl
Cost effective
 
Cons Vinyl
Can rip
Will need replacing after a few years
 
Pros Gunite
Beautiful (my opinion!)
Durable
 
Cons Gunite
More expensive
 
But buyer beware, mark ups and shortages will apply to both styles of pools, unfortunately. Ask the pool company about the timing of both, and weigh out the pros and cons which will make the pool suitable for your family and lifestyle.
 
Salt vs Chlorine
Salt pools are becoming increasingly popular, as they are healthier for swimmers and require a little less maintenance in terms of added chemicals. While some salt water pools do not have that chemical smell that seems to linger after a swim, both kinds of pools still require chemicals to kill bacteria. Both types of pools are considered safe if you are treating them properly and having them maintained weekly.
 
Coping and Surround
The pool coping is what separates the pool from the surroundings, and is often made of stone or concrete because they are non-slip. Many people choose between travertine, bluestone, limestone, and a wood deck. My personal favorite is bluestone, even though it gets a little hot on your feet. The look is stunning and when people are splashing around in the pool, it's not so bad. Your coping can be as wide as a single piece of stone or as big as you want your patio to go. If you are building a patio around the pool, a reputable pool company will suggest waiting a few months for the pool and surroundings to settle before constructing the patio. You can get around this by pouring a concrete foundation for under the patio in order to build right away, but this is an added cost so it is important to weigh out your wants and needs.
 
 
Stairs and Gradient
Where you want the stairs to be and which direction you want the gradient to go is an important step with deciding how you want your pool to function for your family. The stairs can be on the long side, the short side, or in corners. And the pool can go shallow to deep in either direction as well. Think about how you enter the pool area, where people will be putting their stuff down, and where people will hang out if they are not in the pool. Having a sundeck is also something to consider if you have small children or if you like to lounge in the pool, as opposed to swim.
 
 
To Dive or Not to Dive
In order to have a diving board, your pool must have a depth of 8 feet in the deep end. If your pool is not particularly long, you must take into consideration that the gradient of the pool will be strong in order for it to get that deep. This will mean less standing areas in the shallow end. Many people are doing away with diving boards because "lounge pools" have become more popular, however this is very family specific and you should put your family needs first.
 
Pools on a Hill
If your pool is being built on a hill, you can have either a retaining wall built on the sloping side or have an infinity edge. Pools that have a retaining wall give you a nice opportunity to landscape the one side. For example, you can use privacy trees, climbing roses, or large rocks/boulders. If you would like to have an infinity edge, the cost is 20% higher, but you get a seamless look of the water going over the one edge. The far side is essentially a retaining wall that spills into a trough where the water recycles itself back into the pool.
 
Pool Color and Tile
Regardless of whether your pool will be gunite or vinyl, there will be many choices on color for the basin of your pool. Your pool company will show you samples or photos of all the selections. Light grey gunite pools are very popular because the pool water still looks blue but it is not "Tiffany box" blue. Take into consideration your surroundings and how much sun or shade you have. This is a personal preference! The color of your vinyl or gunite should be whatever you would like, and how it will blend nicely with your yard and home. The same goes for the tile you pick under the coping in the pool, if you are building a gunite pool. Be sure to get samples and lay them outside at the pool area.
 
 
Automatic Cover
Auto covers are increasingly popular as they are very safe for families with young children. They cost around $20,000 and roll up like a shade under the coping via a switch near the mechanicals. Not only are auto covers safe, but it helps conserve energy, keeps the heat in, and keeps debris out of the pool when it's stormy or windy. Your pool must be rectangular shape, and not kidney or irregular, if you want an auto cover. Fencing around your pool, will still be required, and you will still need a loop lock in the winter time.
 
 
CONSTRUCTION
Your construction begins with the hole being measured and staked, and dug with machines. If you are doing a gunite pool, the steel rebar will be constructed on site and your pool will start to take shape as the shell is created. This process creates the walls, floor, and stairs of your pool. When it's time to shoot the gunite, the gunite will stick to the steel shell to create your pool. The pool will need to be filled, treated, and goes through a cleaning and curing process before it can be filled entirely to swim.
 
 
FENCING
It is important that you, or your pool company, checks with your local and county codes on the specific requirements of gates and fencing. Your pool will have to have a fence either around your property or directly around your pool. You will not be able to get your C of O and close out the permit without it. Some types of fencing are; split rails (likely with chicken wire), chain link with privacy hedging, and stone walls.
 
 
MAINTENANCE
Weekly maintenance by a pool cleaning company is generally the rule of thumb. They will come once a week to clean the pool, check the levels, and maintain chlorine or salt levels. Many people will try to skirt this and maintain the pool themselves, but oftentimes it becomes a chore too overwhelming than the upside is of saving the money.
 
I hope this editorial helps you understand the pool building process and the decisions that will need to be made in order to get it done. If you would like a pool for next year, it is best to get your ideas in order now and start getting on some lists. You'll be poolside with a cocktail in no time! -Chrissie
 
Our pool specs;
20 x 45 (including an 8 foot sundeck)
Gunite
Bluestone coping, bluestone patio, hand picked!
Coverstar Auto Cover
Infinity Edge
Heated
Pool Builders: Custom Pools Long Island, Ronkonkoma NY
Pool Maintenance: Dingman Pools, Bohemia NY
 
Continue reading

Building a European Inspired Potager Garden

Building a European Inspired Potager Garden
I woke up one morning with a crazy idea. I was going to build a garden. It was a "she believed she could, so she did" moment. I got out my graph paper and starting my journey, not really knowing what was ahead. Ahh, ignorance is bliss.
She believed she could, so she did (with her husband's help)


It all started with a problem area at our house after home construction, and three years later, a pool. We couldn't grow grass in this spot, and the drainage wasn't optimal. But it was a relatively flat area, with full sun, and it looked like a good opportunity for "something". Now that most of our yard is fenced in because of the pool, we now have an area, free of deer, that was calling out to me; "make me a potager!" And that we did.
 
Le Petit Potager, New Dawn Roses


INSPIRATION
I would be remiss to leave this part out. It is important to me to be inspired by things that can push me. I need a goal; one that seems borderline unattainable so I can dig deep and find a way to get there. The first inspiration comes from gardening with my mom as a little girl. She taught me much of what I know about flowers, perennials, and potted arrangements. The second inspiration comes from my great grandfathers English Garden, shown below. Check out the roses seemingly hanging from the sky on wire!
 
 
FIND THE AREA
The first order of business, if you are looking to build any kind of garden, is to find the right area for what you want to create. If you have an area of full sun, it is wise to choose plants that thrive in that environment, such as roses and vegetable. Being that our area is full sun, a vegetable garden made sense to me, as did a cutting garden. This would allow us to harvest vegetables while also enjoying flowers, all being close to the house. A potager garden is preferably constructed on flat land.
 
Flat space, near the house. Perfect for a potager


MAP
After we navigated our way through "where" and "what", we mapped out the potager. We did this first on graph paper, and then outside with stakes and string. A true potager garden has symmetrical lines, while imposing order on nature. Depending on your goals, you can take this as far, or not as far, as you want to. Our garden is symmetrical from every angle (within a few centimeters). And boy, did it take work to get there.
Hooks and String, all measured out


FIND YOUR FOCAL POINT
The first order of business was to find our focal point, something that would sit in the center of the garden and be the jumping off point for how everything would fall into place. We went to our local garden center because the delays on getting one shipped were too long. The one we chose had a square base but a round water basin, which allowed me to play with the lines of the potager however I wanted. We placed our fountain in the center of our area. And worked our way around it.
 
Artichoke Fountain, we used an ext cord under the gravel
EDGING
We used industrial grade 6" metal edging. This was very 'extra' of us and it was truly hard to work with because it wasn't easy to bend and form. If you are looking to edge a square or rectangle space-this is no problem! But for us, we had some issues. Not only did we have to dig down into rocky soil to get the edging into the ground, but we had to connect each piece and even bend some-praying they line up. If you would like to go the metal edging route, be prepared to spend a few hundred dollars. However, there are many styles of edging suitable for all designs and budgets. At the end of the day, our potager included metal edging, repurposed brick edging (found for free on a local Facebook group), and also river rock edging around our roses.
 
Alternatives to our 6" metal edging;
4" metal edging (cheaper that 6" and potentially easier to bend/control)
Rubber edging
Plastic edging
Repurposed rocks or bricks
 
EdgeRight 6" metal edging
EdgeRight connectors, both flat and corner pieces
Dug out some areas to lay repurposed brick, EASY!
PEA GRAVEL PATHWAYS
After the edging was in the ground we rolled out the landscape fabric and laid down the pea gravel. We should have stapled down the landscape fabric at this time but ended up getting too excited and later had to go back and do it. Do not skip the fabric OR the staples. The fabric prevents weeds in a major way, even though at some point we'll have to zap a few with RoundUp. And the staples will prevent shifting that happens naturally with any kind of traffic. See my recent pea gravel blog post for all of my tips regarding pea gravel.
 
Laying the gravel over landscape fabric-use staples!


PERIMETER PLANTING
We chose Winter Gem Boxwoods to line the perimeter of the garden. We dug a trench just on the inside of of the edging and planted the boxwoods with amended soil. We left a little bit of space in between each to give them room to grow into each other. We got trapped in a few spots because of underground sprinkler lines but I think it will work out fine by next year.
Adding amended soil


COMPANION PLANTING
This deserves it's own post one day. One of my goals was to establish companion planting within the quadrants. This would allow flowers and vegetables to live in harmony together and help each other out. For example, I planted marigolds near the tomatoes because the scent of marigolds help deter pests that like to eat tomatoes. I also planted a Butterfly Bush near Bee Balm and Coneflowers, as they are all good buddies! Other good buddies that I planted together are lavender and basil (which will help prevent Aphids) and lettuce with beans! This took a lot of research as I have over 25 varieties of flowers and vegetables, and they were all planted with intent. The good news is that the vegetables are thriving and already ready for harvesting!
 
POLLINATORS
It was really important to me to have a garden that could serve my family but also be helpful to the environment. Having pollinators in the potager is my attempt to reverse the decline of bees and provide food for butterflies. In order to do this I planted; Hummingbird Mint, Bee Balm, Coneflowers, Zinnias, Dwarf Butterfly Bushes, Black Eyed Susans, and Hollyhocks. I also added a Hummingbird feeder.
COST
For transparency, I thought I would break down the cost of this project for my readers, as I am hearing many of you might be interested in doing this. I decided to do this predominantly to share with you that...we can do hard things, which in turn can save a lot of money. But we must be confident in our skills, and use help where it's needed. I am very sure that hiring a landscape designer and a master horticulturist would have cost us $30k to professionally install this potager. And that is likely because this was a tough project, worth every penny of $30k in terms of research and labor. Here is my breakdown;
 
Prep
Stakes and string $35
 
Edging
Metal Edging 6" $1200 "EdgeRight" via Amazon
Brick Edging $0 free on Marketplace
 
Plantings
Boxwoods (64) $30 each
Interior Flowers and Vegetables approx $400
 
Gravel
Pea ravel and delivery with our wonderful landscaper $300
Fabric $40
Staples for fabric $15
Amended Soil $30/yard
 
Focal Point
Fountain $750 (alternatively you could do a big pot with annual flowers!)
Delivery of fountain (we saved $100 by doing this ourselves, it was unforgettable LOL)
 
Installation, approx 48 straight hours in total- 2 1/2 months
24 hours of edging and boxwood planting of all 4 quadrants
3 hours of pea gravel work between fabric, staples, and leveling the ground
1 hour of brick laying
2 hours of ground leveling
1 hour of fountain installation
8 hours of planting flowers and vegetables
6 hours of research, mapping out, designing
3 hours of tinkering to get things right (raking, stapling down cord for fountain, rose pruning on the back wall..)
 
I am so happy with the way the garden turned out. It was everything I dreamed of, and even more. It is ornamental, productive, and delicious. I am so proud that my husband and I took on this challenge, and I am even prouder that not only did we start the job...but we finished it as well! If you are willing to put in the work, I can assure you this is a very satisfying project that can be enjoyed for a long time. Decorating our exteriors is just as important as the interiors. And bonus, I believe this potager looks as good as it tastes. Bon Apetit!
 
Thank you for reading! xx -Chrissie
 
 
Continue reading