Interior Decorating and Design Studio (Locust Valley, NY) Interior Decorating and Design Studio (Locust Valley, NY)

Blog

Week 8-BATHROOM REVEAL

Week 8-BATHROOM REVEAL

IT'S REVEAL DAY!

I am so excited to finally be revealing the One Room Challenge Bathroom. We came a long way from where we were and it came out better than I imagined. We started with a bathroom that was empty and cold, and for some reason the shower never worked. (I never got to the bottom of that but I digress.)

For starters, this bathroom was actually an enormous juggling act for me. This was the first time that I was completely inundated with work and then tried to take on a bathroom renovation in my own home. Life felt very heavy at times, but it was something that I couldn't stop once I started. Nor did I want to. I just had to keep moving forward. And we were pedal to the metal the entire time to be able to finish in 8 weeks.

THE BEFORE:

The saving grace was that we did not need to change the layout of the bathroom. We kept that as is with only a few minor changes such as adding sconces and separating the fan with the light fixture. So the first order of business was to completely gut this space. My husband and I demo'd the shower but called in reinforcements to rip up the floor and do the dry wall. 

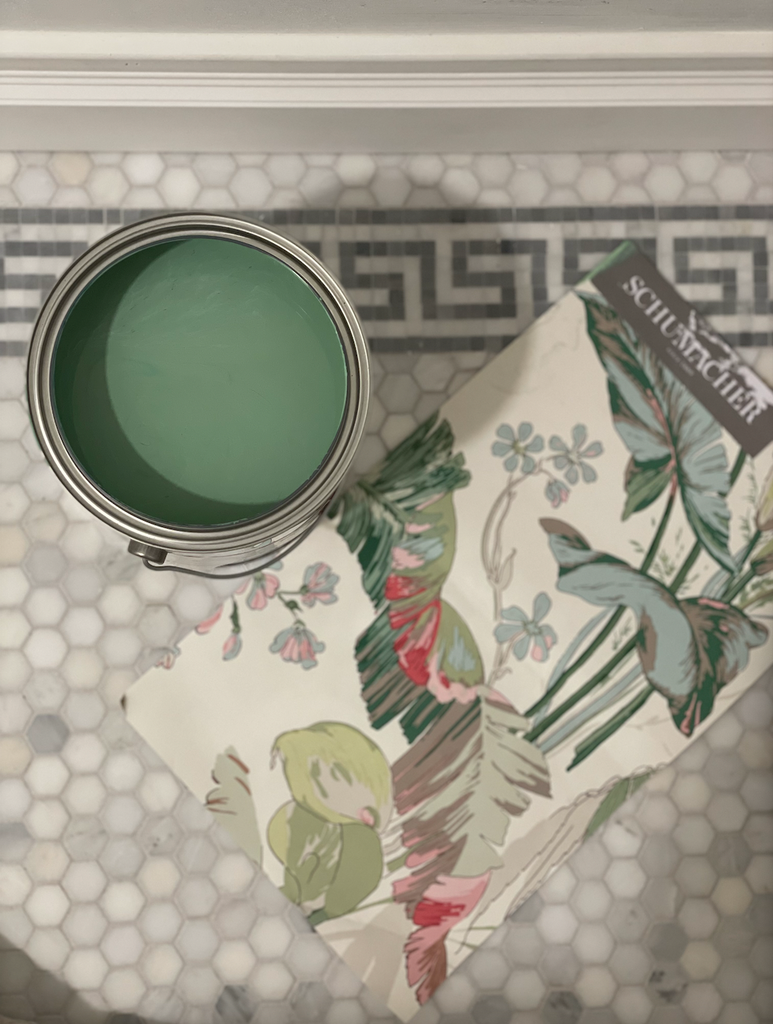
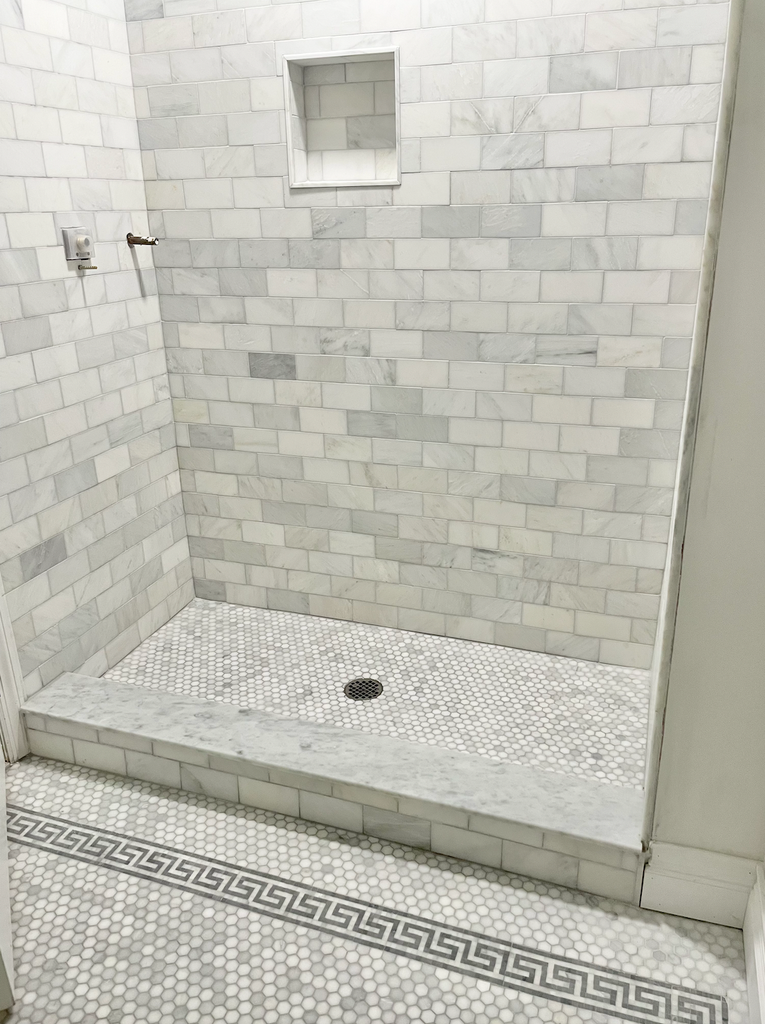
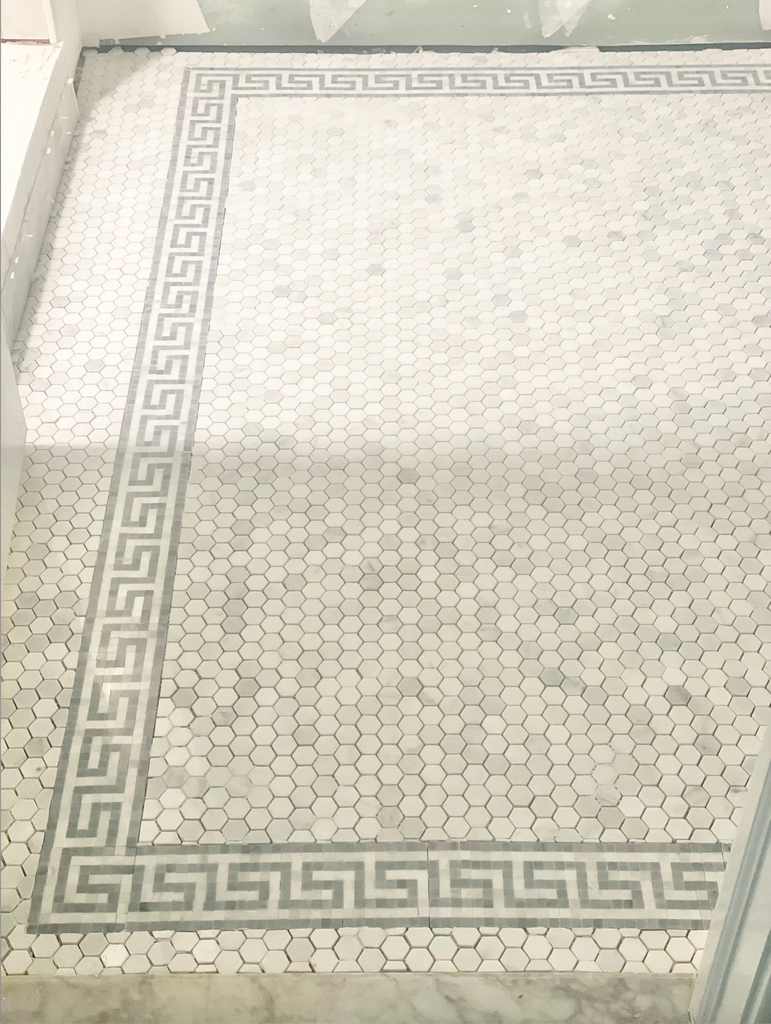
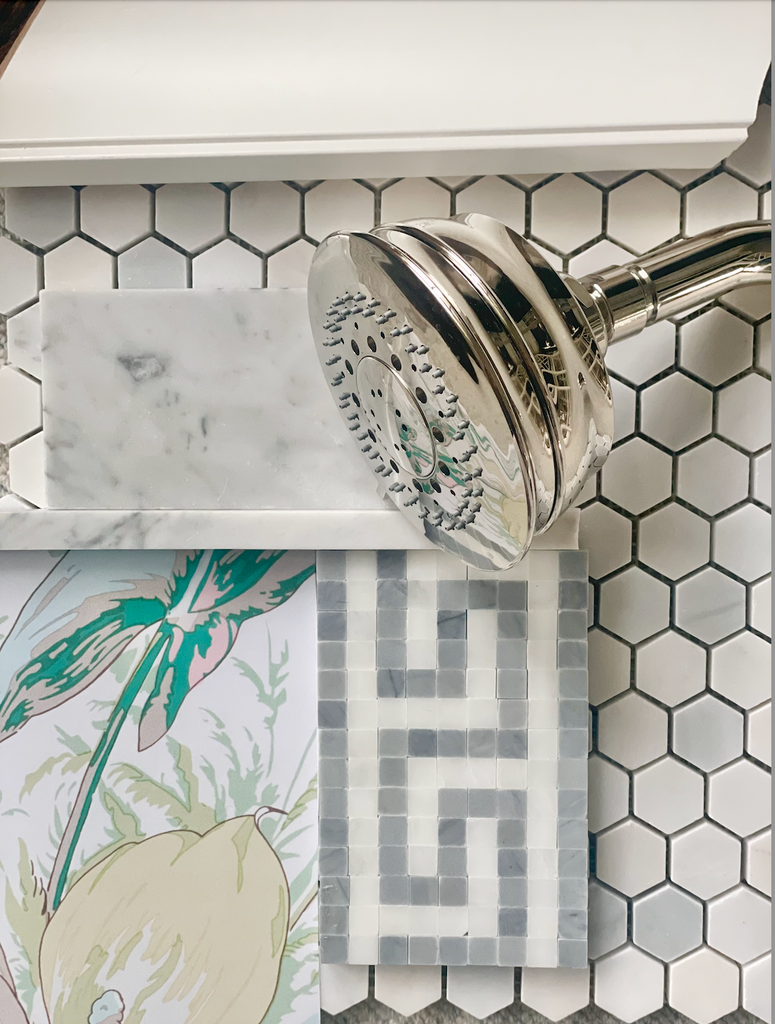
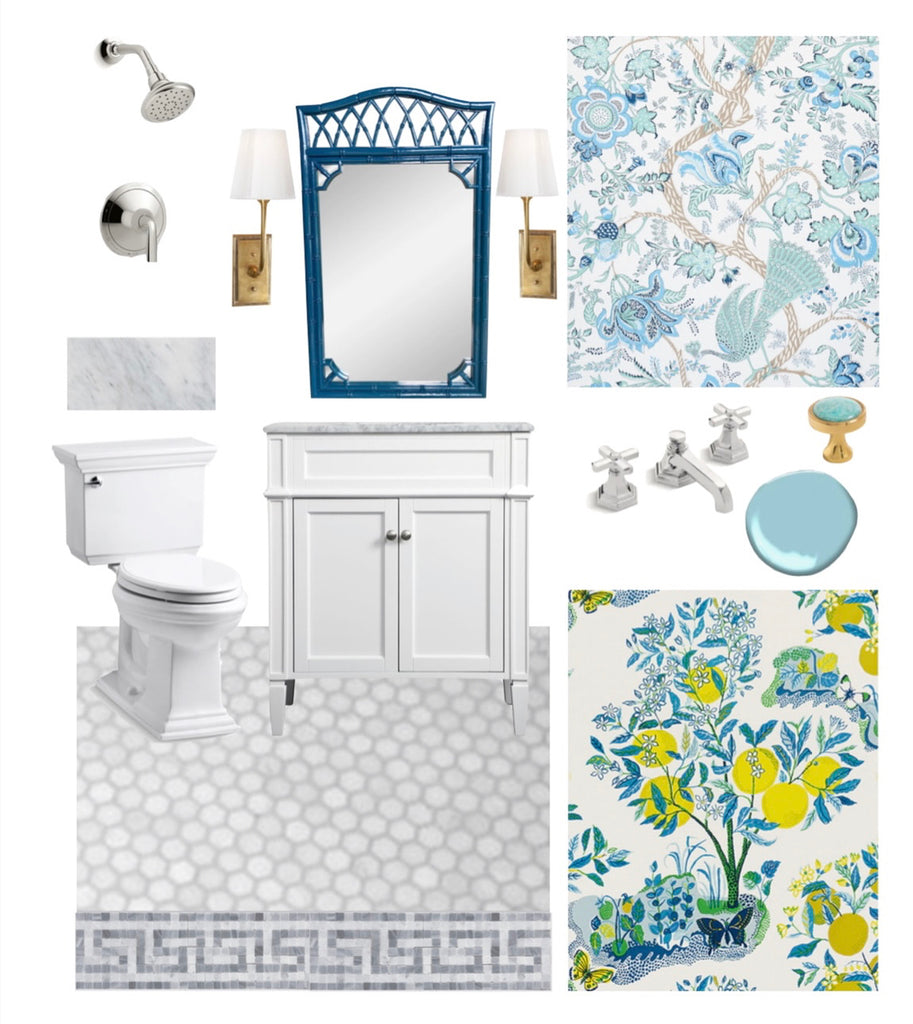
The tile we chose for the shower is from the Tile Shop and it is Hampton Carrara Marble. We used a penny hex tile for the floor with a coordinating subway tile for the shower. The greek key tile is from The Builder Depot. While I would recommend it, I will say you must order overage. It is customary to order 10% and many pieces I had did not work because of the color. You can read more about the tile in a previous blog post.

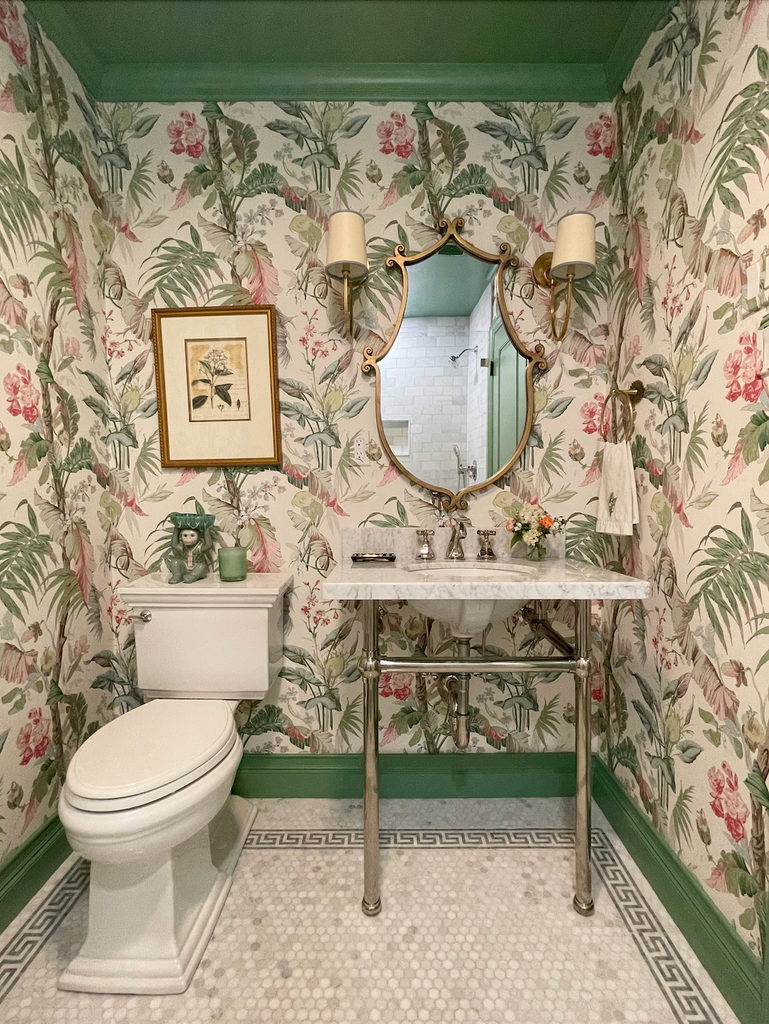
I am so honored to be partnering with Schumacher yet again for this space. The wallpaper is called Tropique and it was one I haven't seen before as a wallpaper. Anything that is new is so exciting for me. The wallpaper makes the space and I'm glad I took my time to find it. It is whimsical, tells a story, and reminds me of a Palm Beach garden. I order through the trade but Schumacher sells this through retailers and you can find it here.

The mirror was a really fun way to add a whimsical touch. I did use some rub and buff to match the sconces a little better. But I love how it played with the wallpaper.

The paint color was matched up with one of the leaves. I ended up choosing Benjamin Moore Winchester Sage and I am so glad I did. The ceiling is a glossy dream and I'm so happy I didn't lean on using blue. 

The faucet (and all plumbing) is all by Rohl, in a polished nickel finish. I chose to do mixed metals in this room because I wanted the staying power of polished nickel with just a touch of brass throughout. The console sink is by Kingston Brass and is also polished nickel with a marble top. And toilet is one of my favorites to use in projects; it is the Kohler Memoirs toilet.

The shower door was made locally by a company named Eqwipt.

The lighting is by Circa Lighting. I loved the fun arm on the sconces and the bamboo inspired flushmount really sealed the deal for a botanical and fun bathroom. 

I added trim to the shades as a little last minute DIY project. And I will share more about that in the future. Adding trim to the shades really took the lighting up a notch.  

The accessories, towel ring and toilet paper holder, are by Anthropologie. They're so sweet and I loved how they mimicked the leaves in the wallpaper. 

Thank you for sharing in my joy over this new bathroom. I am so happy that now we have a working bathroom full of all the glamorous details. Now there is no keeping guests away. And thanks perfectly fine! Thank you for reading, so happy this is DONE! xx -Chrissie

Please check out the other designers here because the reveals are happening this week. Thank you to the One Room Challenge and Apartment Therapy!

Continue reading

Week 7 Paint trim and wallpaper

This is the last update until the reveal. And, sadly, I feel like I've been at a stand still. There's been a lot of waiting around and I just have to be patient.

I finally chose my green paint color for the trim and ceiling. It looks unbelievable and I'm so happy. It took 3 tries to get the gloss right-but it is perfect now. The baseboard and moulding trim is all the same color and finish as the ceiling.

And the wallpaper arrived. It is a dream to be able to work with Schumacher again on this project. And now I don't have to look at the tiny sample anymore! 

Here is the wallpaper, which is a 57" wide roll!
And lastly, the lighting arrived. I chose a brass bamboo flushmount which I thought would be fun with the botanical palm print. And the shape of the sconces are a little whimsy!

See you in a few days for the reveal! And be sure to check out the other contestants here.

Continue reading

Week 6, Shower Door and Paint

Week 6, Shower Door and Paint

It is Week 6 for the One Room Challenge and I'm at the point in the project when I start to stress about every little thing. This could possibly be the first challenge that I finish on time! 

This week the shower door was installed. It came out great. Since the shower is only 30" wide, we had the door mounted closer to the outside instead of central on the saddle. This helps to maximize the space in the shower just a little bit. Since the majority of the metal in the bathroom is polished nickel, including the shower plumbing, we did polished nickel on the shower door hardware. 

The console sink arrived, but I am just waiting for some of the trim pieces. The only thing left is the wallpaper and lighting-a major detail. I am hoping to get it done on time!

I finally picked the paint color-and I think it will be awesome!

Check back next week-I should have big changes by then! And as always, check out the other contestants here.


Continue reading

Week 5, Tile complete & wallpaper selection

Week 5, Tile complete & wallpaper selection

Welcome to Week 5! When things tend to slow down until they pick up steam for the final few days.

The tile is complete and I am so happy! Since last week's update we added the grout to the tile in the shower and on the floors. I used a really soft grey grout called whisper grey and I think it came out sensational! I love that the small tile looks a little old world. The greek key looks great and was worth all the work to get the corners to line up. The final part of the tile project was getting the baseboard and trim put up. Now we are prepped for wallpaper.

I decided upon the wallpaper (finally). It is called Tropique by Schumacher. I love the blush version because I can pick up greens and blues for the trim and molding. This helps it to not feel so feminine since there is some pink in it. The wallpaper does have another colorway (yellow and green) and I have been pondering whether or not that may be better for this little bath. I think I am going with the blush but whenever I second guess myself, it sends my brain into a blender. More to come, but I have to decide soon!

The mirror arrived, and I love it! I will probably paint it or use rub n buff but the curves are awesome. It is just a touch too bronze-y to compliment the polished nickel.

By this weekend I will have all the plumbing installed, and that will be my next update! In the meantime you can check out all the other participants here. Thanks for your support always! 

Continue reading

WEEK 4, GREEK KEY FLOORS!

WEEK 4, GREEK KEY FLOORS!

Welcome to Week 4 of the One Room Challenge. This is the halfway point and I am so glad that by now the floors are in. 

The first order of business was to lay them out on the floor and pick the pieces I wanted to use (I ordered 10% overage). We laid them down in place before the thinset went in to secure them.

I must be honest and say that the tile gave me a little bit of anxiety! Not only was I working with tile from two different places, but the greek key tile arrived and a good handful of them were unusable. Even more of a pain, the corners never matched up. I will send the unused tile back however I needed the corners and was on a schedule. I took the small tile pieces apart and recreated them. I think I lost two years off my life with this, but we made it!

Next I have to decide which vanity I want (hope it gets here ASAP) and pick the wallpaper. One of the samples came in and I am in love! Will share more throughout the week. Thanks for checking in and supporting this project! Half way to the reveal! And if you want to see what the others are up to click here

Continue reading

One Room Challenge Bathroom, Week 3 Demolition Complete

One Room Challenge Bathroom, Week 3 Demolition Complete

Welcome to Week 3 of the One Room Challenge. If you are new here, we decided to renovate our lower level bathroom which was original to the home (and wasn't in working condition). Now that we have a pool, this bathroom will be used quite frequently and it was time for a makeover.

This week my husband and I continued the demolition phase. After looking up youtube videos, we discovered that our bathroom just isn't coming up like they're showing. The bathroom was so old that the technique that was used when building it was wire and mesh filled with concrete. It's called a mud wall and it was 1 1/2" thick. It took a lot of sledge hammering and nothing came out in sheets. Needless the say, we got through it but it wasn't easy and I never want to look at tile over concrete ever again!

It was time for our handyman to come in, and we are so thankful. He was able to properly remove what we demo'd, and he started to take the bathroom walls down. We had a couple of tricky walls and decided it was easier to recreate new walls instead of doing awkward patches and necessary things to make the walls flush (that escalated quickly!). Happy to have his help! He took the walls down, and put new ones up. We added a new fan, and he built a new box for the shower pan. And I particularly love that my "wish list" is still on the wall. It's kind of a joke now as it moves around the room-never forget where you started.

Next our plumber is coming to trim out the shower and create a new shower pan. I'm excited to see the fixtures go in at the end! While this is my first time actually getting my hands dirty for a bathroom renovation, I have done a lot of bathrooms (in my semi short career) at this point. And one thing I will never attempt is plumbing. Please always spend the money to have a professional come in. And while we are at it, it's really important to have a certified and licensed electrician as well. This is for your safety and to protect your wallet long term. It is easy to do some things with youtube access by our side but I have seen and heard a lot of things that could have been avoided if pride wasn't a factor. 

I picked up the tile this week and will be going through it all to make sure none are broken or look wonky. We have marble subway tile going in the shower, and a 1" marble hex going on the floors, with a greek key border. I am so excited for it! 

I'm still undecided on wallpaper, and I'm hoping I can find one soon. That will dictate the remainder of the accessories. I am really hoping Tropique will work out but I am still awaiting the sample. I would love to paint the trim and ceiling green, or maybe a soft blue. How fun for a pool bath, Palm Beach inspired.


Come back next week for tile updates! And check out the other contestants here


Continue reading

Spring 2022 One Room Challenge, Week 2

Spring 2022 One Room Challenge, Week 2

Welcome to Week 2! This week was a little slow for me as we started to get off the ground with demo work. This will be my 3rd One Room Challenge, and each one becomes trickier for me to juggle. While I am trying to complete the one room in my home, I am actually doing several "One Room Challenges" for all of my clients. And right now I am a one woman show.

The highlight of my week began the second our shower door exploded while I was trying to remove it from the track. I am not sure why this happened or how I could have prevented it but it was a real mess to clean up. Since it is tempered glass (the preferred glass for shower doors) it is meant to fall and break down into chunks as opposed to large sharp shards. Thankfully I was okay but it was pretty unexpected! I am now considering breaking the other one because, in the end, it is easier to dispose of. If I leave a single shower door sitting around the house for too long, a hockey puck is sure to go through it.

Next on the list will be removing the tile and floors which should be pretty easy. And then the plumber will come in to rough the shower. I am still not sure if I should keep the pedestal sink or not. It is something I have been going back and forth about. It's pretty, and in good condition, but I wanted something larger. We'll see.

My tile arrives this weekend, which means that I don't think I will have new tile into the floors until week 3 or 4. 

The plumbing started to arrive and it is looking beautiful! I chose polished nickel for the plumbing fixtures in this bathroom, and I am thinking the  lighting and accessories will be brass. The plumbing is all by Rohl.

By next week I should have my wallpaper finalized-my front runner is Tropique and Seychelles, shown below. I will do a coordinating glossy color on the ceiling, and I can't wait! Thank you for reading, and be sure to check out the other contestants here. See you next week!

Continue reading

Spring 2022 One Room Challenge, Bathroom Renovation

Spring 2022 One Room Challenge, Bathroom Renovation

Welcome to another One Room Challenge Project! This time it is a bathroom renovation which I am both excited and nervous about. I have renovated many bathrooms at this point, but I am most nervous for this one because of the timeline and necessary things that need to fall into place to meet the deadline. But one I thing I have learned while designing homes, especially during the times we are in, is that beautiful things can happen even if you have to pivot your way through plans. Some of my favorite spaces had twists and turns that you wouldn't believe. This project in my own home will be no exception to that!

THE HISTORY

This bathroom was part of the footprint of the home when we purchased it. We gutted and built the rest of the home but left this bathroom alone. We changed the floors and painted-but didn't do much else because we wanted to focus on the main floor and the upstairs. This concept doesn't seem so far fetched, however slowly things started breaking. The medicine cabinet started peeling off, the towel bar fell off, and the shower plumbing broke. We have had 2 plumbers look at it, we have replaced parts, and here we are still with a shower that isn't working, and multiple unused parts that we never got to work. It has shown me time and time again that it needs help.

DEMO

The plan is to gut this bathroom completely. While I understand to some it is not a terrible bathroom, but to me it is sad and lonely. It is looking for life, and it is looking to be in working order. This is a bathroom that everyone uses when at the pool, in the backyard, or playing in the basement, and I am ready to get it working again. Especially the shower!


THE DESIGN PLAN

We will be doing small penny hex's on the floor, and matching marble subways in the shower. I am most excited for the tile because I will be laying out a greek key trim on the border, because I'm bougie like that. The fixtures will be mixed metals with polished nickel and brass. And the wallpaper is TBD. I unfortunately can't decide on the wallcovering and discovering how this unfolds will be exciting. Details like the vanity knobs and the sconce shades will be decided upon once I nail down the wallpaper. 

Every week I will be documenting progress and I hope you will cheer me on. You can see what other contestants are up to by visiting here

https://www.oneroomchallenge.com/blog/orcspring2022wk1

Thank you for following along! Your support means the world as I navigate my way through decisions and hopefully very few delays  -Chrissie

Continue reading

Forsythia: Cutting and Force Blooming

Forsythia: Cutting and Force Blooming

Your Forsythia is commonly one of the first signs of spring. After a long winter, it's no surprise that we rush to trim it and bring it inside. We are usually ready for some color by then. If your Forsythia is not quite in bloom yet, you can still trim them to bloom indoors. Here are some tips to force bloom them, and how to keep them lasting as long as possible in a container if they are already in bloom.

Head outdoors and grab a few branches from all around the bush. Try to take them evenly from the bush so you aren't left with a bald spot later. They will have small green or brown buds on them. Cut them as long as possible, and don't be afraid of the ones that are a little wild or whip-like. Those will help add so much character to the arrangement. 

Before arranging the Forsythia in your vase, snip through the bottom of the cuttings to allow more surface area for drinking. Alternatively you can smash the stems, much like you would a lilac. Interestingly enough, Forsythia is in the same family as the Olive Tree.

Remove the bottom flowers so that they don't sink below the water line. This will help keep bacteria out. Replace the water every other day about 1/3 of the vase and place your stems in a bright spot with some indirect sunlight. Your blooms will start to appear within a week or two. 

Other flowers you can force bloom are Redbud, Dogwood, Cherry, and Magnolia. I hope you will try it. And enjoy your bright, spring blooms until then! -Chrissie


Continue reading

Kintsugi Tutorial

Kintsugi Tutorial


Two years ago one of my late grandmother's Rose Medallion bowl broke. Something I always had on display, suddenly into 22 pieces. I saved all the pieces because I couldn't stand to throw it away. I came across the ancient Japanese art of Kintsugi, and decided to buy a kit.

What is Kintsugi

Kintsugi is a centuries old method of repairing broken pottery by mending the pieces together using a series of steps that require lacquer and gold dust. The fascinating part of Kintsugi is that once your piece has been repaired, it doesn't become new again. It becomes something entirely different, but somehow better. The breaks become appreciated, rather than something you are trying to hide. The journey of fixing this bowl (which took about 2 weeks) was very healing in many ways. We can apply the concept of Kintsugi to many aspects of our life.

Here is the kit I purchased, which I recommend. There are also beginner kits which only come with one product. Depending on your project and journey, choose accordingly.

Step One

Gather all the pieces and reimagine them together. Do you have them all or are you missing some? If you have them all, great-you are like me. If not, the kit comes with directions on how to recreate the missing pieces.

Step Two

Make the Mugi-Urushi by combining one to one ratio of cake flour and tap water. Once it becomes sticky, add the Pure Urushi to the mix until sticky and thorough. Be sure to wear gloves because this part gets messy. Apply the Mugi-Urushi with the provided spatula. I applied all the pieces together at once but if I wanted to perfect the process, I could have broken this up into stages to ensure a seamless application. Once the pieces are put together, wipe the access clean with the stick given in the kit. And wipe with a cloth so that you have less work cleaning it later. I should have spent more time on this part.

Step Three

Seal the cracks with the provided tape for added adhesion while it dries. I taped every crack closed so it would stay together.


Step Four

Create a box called a "Muro". Your piece will sit in here for roughly a week. This drying cabinet will have a damp towel underneath, with sticks so that the pieces can sit inside without touching the towel.

Step Five

When your piece is ready to remove from the box, you can begin to remove the tape and see how it held up. I took a cloth with turpentine and smoothed out the excess, scratching off little bits that somehow got all over the place. Then I sanded down the cracks so that they were flat, with the provided sandpaper. This part took me about an hour and the more meticulous you are, the better it will come out.

Step Six

I added a small amount of the Neri Bengara to a paper plate and applied it to the cracks. This was a redish color paint that makes the cracks sticky again so the gold powder would later adhere. I painted over all the cracks carefully with a fine paint brush. Any excess or mistakes can be wiped away. Wear gloves for this step as the Neri Bengara stains your skin (oops).

Step Seven

After waiting about one hour for the Neri Bengara to maintain its stickiness, it is time to add the gold powder to the lines. They gave two colors in the kit to choose from, alongside a silk cotton ball. I dipped the silk cotton ball into the powder I choose and delicately pressed it onto the painted lines of the bowl. I went over each spot two or three times to make sure it was covered, then wiped away the excess with a brush, being careful not the touch the lacquered lines.

Step Eight

Place your piece back into the Muro box for an additional week, making sure the cloth stays damp. When it is time to remove your finished piece you can continue to wipe away any excess with a cloth (I had to really work at this part because it was caked in pretty good!). It is recommended that you don't use the piece for 4 weeks but for me, it's decor so I kept it out.


TIPS

Spend the time removing any excess but because you have the cracks filled entirely

Don't skimp on the sanding process, it will ensure you have smooth lines

Be patient and enjoy the process


Hope you liked this segment and I hope you will try it someday, either the version I used or a simpler one. Whichever method you choose, I hope it creates a fun and meaningful process for you.

Continue reading
  • Page 1 of 5