Interior Decorating and Design Studio (Locust Valley, NY) Interior Decorating and Design Studio (Locust Valley, NY)

Blog

Everything you need to know about Pea Gravel: Gardens and Beyond!

Everything you need to know about Pea Gravel: Gardens and Beyond!
Sneak peek at our English Potager Garden!
After recently designing (and building!) our English style potager garden, I received a lot of questions on our pea gravel. So let's dive in to what I have discovered about these delightfully beautiful stones, and a few do's and don'ts.
 
 
FUNCTION
Not only does pea gravel serve as an attractive way to enhance your garden, but it can also be very useful as well. The small stones provide drainage and can help break up pools of water from the rain. You can also use pea gravel in trouble areas where it may be hard to grow grass. It will create interest in an area that is otherwise hard to do something with.
 
COLORS
Pea Gravel is generally made up of small white stones, up to 1/3" in diameter, and come in a variety of different colors. Some are all white, and some are a mix. The mix varieties come in many different shades of ivory and brown to suit your aesthetic. It is best to go to your local garden center to choose the color that works best for your project. If you are having a hard time choosing, I tend to think the soft ivory and tan shades resemble some of the most beautiful English and French gardens in the world. White or full grey stones are more transitional and modern. There is no right or wrong choice, but consider the home and the surroundings when deciding.
 
COST
While it would be hard to give a definitive idea on cost, because it is location based, I will share some tricks. If you are planning to do anything bigger than a small, simple path, it is best to choose your gravel at the garden or stone center, and have them deliver a truck to your driveway. This is also something your landscaper can do, and they might be able to save you some money as well. We used our landscaper and he delivered it right to us.
 
Our landscaper delivered the stones right to us
MAINTENANCE
Pea Gravel looks beautiful when it is maintained. But like anything, once you loosen the slack it will start to show. You will need to control the weeds that grow through by either pulling them up with your hands or using weed killer. If your gravel is in a high traffic area, it will be important to gently rake it often to fill in the holes or spots. Pets, children, wheelbarrows, and general traffic will all start to shift the rocks over time and some areas may become too bouncy while others will become bald. I rake mine every other day to keep it even and to maintain a pristine look. If you don't have a gravel rake, you can flip a regular rake over on its back side. I also use the blower on a gentle setting to remove debris.
 
 
LANDSCAPE FABIC
For the love of all things holy, please use landscape fabric under your pea gravel. Amongst all the things we have to do in life, more weeding is generally not on the top of our list. I purchased a 3' x 100' roll for about $40, which is supposed to help keep weeds away for 5 years. I have pulled only a few up on the sides and it makes me wonder how many stubborn weeds I would have if we didn't lay the fabric down. Before applying the fabric, rake and even out the soil so the gravel can be laid out evenly. I will also recommend using the staples that are sold separately. We skipped this step and later went back in and hammered a bunch into the ground through the fabric. Not only do the staples stabilize the fabric but it prevents any edges from getting pulled up. You will have yourself a mess if you don't use the staples, especially in a high traffic area.
 
Laying out the fabric, use staples to secure it
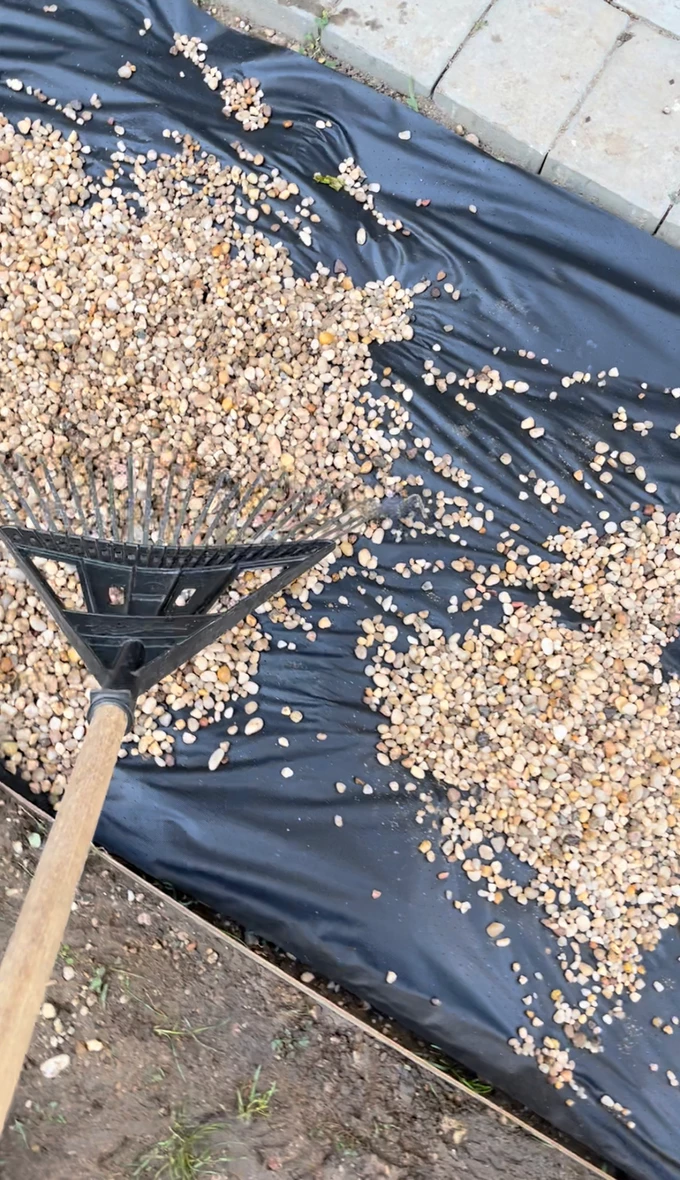
Raking the gravel evenly
EDGING YOUR PEA GRAVEL
It is imperative that your gravel has edging, otherwise the small stones will start to spill into unwanted areas. There are many ways to edge your pea gravel, according to your style and budget. The most common ways are with metal edging. plastic or rubber edging, bricks, or rocks. Rocks and bricks (or any type of stone) are great companions for pea graveled pathways. Creating edging a couple of inches above the gravel will help maintain a defined line of separation for a crisp look.
 
Repurposed brick edging
Metal edging
PEA GRAVEL FOR DRIVEWAYS
Sneaking this in here at the end because it's an important one. Nothing says enchanting like a white pea gravel driveway. But if you've had one before you know it's a love/hate relationship. The rocks spill into the street, they will get stuck in anything from sneakers to car tires, it's difficult to plow, it's uncomfortable on bare feet, and you will have to replenish the stones every so often because they eventually vanish into thin air. But, the look is unbelievable if you're willing to maintain it. There is a new method called "Hot Oil Gravel" or "Tar and Chip" in which a thin layer of hot oil is put down on the pavement (or existing driveway), and the stones are spilled and evenly raked on top. A thin layer of loose stone is applied for a natural feel, allowing most of the stones to be stabilized underneath. You get the look without the fuss. This is a nice alternative to regular loose pea gravel, and one you should ask about if you're interested!
 
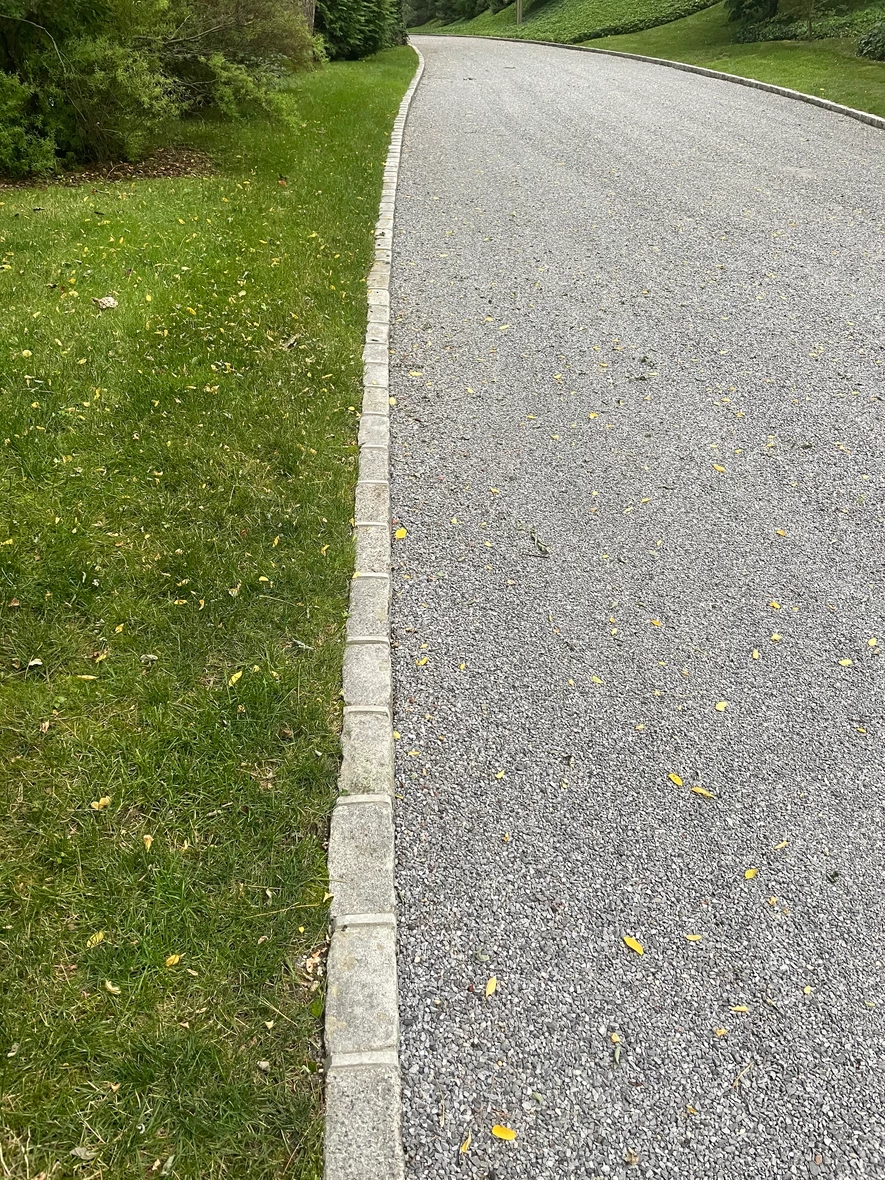
This is our road, tar and chipped
I hope you got some useful information out of this post, and I hope I have given you the confidence to try pea gravel somewhere at home. The look is lovely, and you will enjoy it for years to come. Thank you for reading, and be kind to one another xx -Chrissie
 
Continue reading

Preparing Your Home for the Hot Spring Market

Preparing Your Home for the Hot Spring Market
Happy First Day of Spring! The weather starting to turn is a sure sign that change is on the horizon. If you are taking advantage of the hot spring market, I have a few tips for you, including some suggestions from local real estate agents. Alternatively, if you are staying put, this list will also help you liven up your home for the nice weather and get a fresh start.
 
Curb Appeal
Curb appeal should always be a priority; I can't stress this concept enough. If you have followed me for awhile you know that I am always finding ways to freshen up my front porch. Being able to enjoy what you see when you come home is precisely what buyers will see when approaching the house. Make it special by using potted plants, a nice fresh doormat. Keep the sidelights or windows near your front door clean, and maintain a weekly lawn mowing schedule and include a layer of mulch. It may also be nice to wipe down your mailbox and have the house number clearly visible. This is good feng shui and according to Daniel Gale Real Estate agent Alexis McAndrew, "buyers decide within the first 8 seconds if they like a home". How mind blowing is that?
 
Hire a Painter or Handy Man
Years ago, when my husband and I sold our starter home, we hired a painter for the weekend to fix any scuff marks, dings in the moldings, and anything that needed attention. We put a fresh coat of paint on all the baseboards, re-stained our small front porch, and got all the squeaks out of the hinges. Compass real estate agent, Alex Hulse, suggests getting out the power washer "to clean up the bluestone and your porches". I think this was the best money spent before we started showing the home to potential buyers. Buyers will see that you care about your home and in return they may feel as though you have maintained all other aspects of it. It is also a nice way to thank your home for all the hard work it has put in for you over the years.
 
Declutter
Just the word alone is overwhelming. Moving is always the perfect opportunity to go through your belongings and decide whether it stays or goes. This includes toys, clothing, and "stuff" in general. McAndrew tells her sellers to "rent a storage unit and put 1/3 of your things in that storage unit for a few months of showings". She says it may cost $100 but the difference in offer prices will be significant, especially if they can see the closet space better. After all, when has it never been about closet space?!
 
Detach yourself
McAndrew suggests "removing about 50% of your family photos" in effort to depersonalize and free up space. This allows buyers to better envision their items in your home. Sorry to say it, but no one wants to see your personal stuff. Eeks, there...I said it! Putting some of your collectables away for the time being will help the house will feel more neutral and less like someone else's current home. Just store away the tchotchkes for now. This in return will attract more serious offers.
 
Day of Showings
On the day of showings, it is important to create a mood. Be sure the house smells neutral, and if it's a beautiful day, open all of the blinds and even a couple of the windows. Run through the home one more time and empty the garbage cans, put the toothbrushes away, vacuum or mop, clean the kitty litter, and get the dishes out of the sink. I have been known to quickly throw a couple of items in the oven last minute to get them out of the way-don't ever tell!
 
Escape for the day
I will leave you with a very funny story about a time when we were house hunting a few years ago. We walked into the house and the home owners were there! The dad was in the kitchen cleaning up and the two young boys were eating cereal on the living room floor watching a basketball game on TV. I couldn't believe it but we said hi and continued on through the house. As we headed into the finished basement, the mother was in her workout gear exercising with her Suzanne Somers thigh master on a workout bench, in front of a mirror! We laughed about it then, and still laugh about it now. Whatever you learned here today, please remember to leave any kind of confrontation during showings to your trusty real estate agent and for the love of god, store away the thigh master!
 
Thank you for reading, and a special thanks to Alexis McAndrew and Alex Hulse for contributing! For more tips, be sure to sure to follow me here and on my other social media channels. xx -Chrissie
Continue reading

Antique vs Vintage; The difference and how to spot it!

Antique vs Vintage; The difference and how to spot it!

My grandparents antique table, made in 1900


Did you know there is a difference between antique and vintage? There is nothing like coming home and feeling disappointed because what you thought you were getting is actually something else. If you are someone who likes to shop second hand at local consignment boutiques, it's best to understand what you are buying. Here I will break down the difference between the two, and will also share what to look for when you are shopping so you are sure to come home happy...and with something of value!
Antique
The first way to know the difference between vintage and antique is to know the age. Just because it looks 'old' does not make it an antique. Plain and simple, anything built or created 100 years ago, 1921 or earlier, is considered an antique (according to the United States Customs Service). The biggest challenge will be how to know when something was made. If you are in a second hand store, ask about the item. There is a chance the store owner can tell you where it came from. Additionally, you may need to do some digging around. I encourage you to find out the history of an item or piece of furniture because it will make you love it that much more when it's sitting in your home. But beware of a store owner trying to sell you something "antique from the 1970's"-they are not credible! And although what you are buying may be vintage or collectable, it is probably not a true antique.
 
Vintage and Collectibles
The term vintage is used very loosely. It mostly just means old (but not THAT old). Something that is retro or collectable is considered vintage. Vintage items can be anything from the 30's to about the 80's. I personally wouldn't refer to anything made in 2000 as vintage but I would equate that mentality to forgetting that 2000 was already 20 years ago! Time moves fast. My mind tells me this is a "collectable", especially if it's value has increased over time.
 
A vintage sideboard, purchased locally on consignment
So, how will you know if that sideboard you are buying is antique or vintage? If the store owner can not guide you of the origin, you must take a look at other pieces that were built in the early 1920s or earlier. How difficult is it to reproduce? What was common at that time? Is it signed or stamped? Look for marks and research them (silver, for example, as a little square with a stamp inside). Has your piece been altered? Many antiques have been altered in some way over the years just due to the age and possible number of transports over the years. But don't be fooled, you may find an antique that is actually a replica or you may find a real gem that is a true antique. Either way, if you love it, consider it sold!
 
Shopping for vintage or antique items is better for the environment and creates a home unique to you that can not be replicated by anyone. Whether the piece you have found is from 1900 or 2000, buying something that you love is really what matters because that is where the true value lies. Unfortunately, not all antiques are worth more than what you purchased it for OR worth more than the cost to repair it. But if I leave you with anything, it's this; finding something antique or vintage is something you have specifically curated for yourself and your home. And that's fabulous!
 
Thank you for reading! Be sure to follow my social media channels for more. -Chrissie
 
Continue reading

3 Things Every Room Needs

3 Things Every Room Needs
One of the things I always try to avoid is tell people what they "have to have" and what they "must buy now". Even as a decorator, I don't like the concept of making people feel like they have nothing and need to 'spend more' to have 'everything'. However, if you want to have a little cheat sheet towards getting a room underway, and potentially if you're on a budget and can't buy all new furniture, see my tried and true list below.
 
1. Lighting
...and I hopefully say this with complete conviction; every room needs good light! Most often times this includes a chandelier, but doesn't have to. If you are building a home or creating a space from scratch, over head can lights are fabulous but ask the electrician to also wire for a chandelier. Especially for your living room. You will never regret statement lighting and it is oh so important. If you don't have the ability to have an overhead chandelier or semi flush, find a couple of fabulous table lamps for your console, or a couple of wall sconces. I have seen so many wonderful chandeliers and sconces on consignment for terrific prices.
 
 
2. Window Treatments
It is rare that having no window treatments is part of the design. Even the most beautiful homes on the water with views that are BEYOND need a little something. It is a common misconception that window treatments will cover the views, but drapery should not cover any part of the window when it's open. At best it should cover the trim on the sides, but never the window. If you have shades that, even when rolled up still cover some of the window, you'd be hard pressed to find that the negatives outweigh the positives. If your room is painted, find a fun pattern for your fabric. And if you have wallpaper, either find a fun pattern or do a solid fabric with a tape. Having window treatments is like getting dressed up for a date and putting on a bold necklace, or wearing a suit and finally putting a tie on. It just makes it.
 
 
3. Color
Neutrals and whites might be your jam. And whatever your thing is, stick to it. Because no one should tell you what to like. But if everything is neutral there is no depth and your items will start to drag your eye around the room-as if the eye is waiting to find something to look at and it...just...can't. Add that one punch of something. Maybe its art, or a bold chair, a rug, or a lampshade. Maybe it's something as simple as a great patterned pillow or a plant. Find that one thing. I love to use a art, bold paint on the walls, or some chinoiserie.
 
I hope you found this short list achievable in your own home. Decorating takes time, and usually (and sorry to say..) a little bit of money. But you don't need to start over from scratch to have the beginnings of a great, and livable, space. Adding the elements I listed will take your room to a whole new level. Thanks for reading and be sure to follow me on Instagram for more! -Chrissie
Continue reading

How to transition your home from Christmas to Winter

How to transition your home from Christmas to Winter
The holiday season has come and gone, and it's time for a long winter's nap. Here are a few tips to help you keep some decor up for the winter time.
 
 
1. DECLUTTER. The biggest complaint I hear about Christmas decorations is that it clutters up your home. Here is a great opportunity to donate some of the decorations you didn't use or like this year. It is of utmost importance to rid your home (and your soul!) of anything that did not bring you joy this holiday season. If you didn't use it this year, or last year, it's time to re-home it.
 
2. RED. Take away most of the red (Bye Santa, we love you!) The palette will be more neutral and calming, now that Christmas has passed.
 
3. TREE. I think it's fun to take the ornaments down but leave a bare tree up with lights! This allows you to pack the ornaments away with the majority of your Christmas decorations. If your tree is dry and dead, I suggest having it exit the home. But an artificial tree allows for it to stick around.
 
And finally, here are some items to keep around or add to your winter palette;
1. Pinecones
2. Greenery branches and trimmings for a vase
3. Snow related items such as snowflakes or icicles
4. Metallic accessories or something with sparkle and glam
5. Wood and textures, think Woodlands or Birch wood
6. Fur blankets and pillows
7. Painted white branches (could be a fun DIY)
 
Enjoy the winter season, and all the chilly (but cozy) nights it brings!
 
Thanks for reading! -Chrissie
 
 
Continue reading

One Room Challenge, FINAL REVEAL!

One Room Challenge, FINAL REVEAL!
 
I am so happy to finally share my dining room with you all! It is a reflection of who I am at the deepest level. It is a mix of fun and serious, with an attention to details, and blue & white. I first off want to thank F. Schumacher 1889 for partnering with me on this project. The custom details from them really elevated the space beyond anything I could have ever imagined. And a special thank you to Sandra Prendergast for helping me get this done. I only have one regret: I wish I had chosen a space to makeover that we used more often because I love, love, love it! Next time...!
 
GOALS
The goal for the dining room was to brighten it. We felt like it was a dungeon, and the rug and dark furniture perpetuated that. We walk through the dining room multiple times per day to get to the office so the room really needed to be bright and open before heading to "work". I also wanted to do some of the work myself. I am not a huge DIY person but I did enjoy this particular challenge, and I met it head on.
 
WALLPAPER
I waited what felt like a century for the wallpaper. It is a painted grasscloth called Feather Bloom in Two Blues color way, made by Celerie Kemble for Schumacher. It is so stunning in photographs and even more stunning in person. The way this wallpaper transformed the space was unbelievable, right down to wallpapering the outlet covers. The one very tricky part about this particular wallpaper is that the pattern repeat is over 60" and the wall space to cover over the chair rail was 62". This meant we had quite a bit of waste. We ended up having just enough, even though we had leftovers. The leftovers were not usable because of the repeat. They wouldn't have matched up on the wall so they were discarded. I will likely line some of the drawers of the sideboard (and elsewhere!) with it. I can say with complete confidence the wallpaper was worth the wait. And I would 100 times over choose it again.
 
 
DRAPERY + HARDWARE
The drapery is a soft, off-white polished cotton with a blue greek key tape on the leading edge, both by Schumacher. I chose the greek key as a way to balance out the naturally curving lines in the wallpaper. The color was also spot on and I couldn't resist. Special shoutout to my husband for hanging the drapery rod, against his will, and to Ray and Izzy for creating and installing the drapes.
 
 
The rod and hardware is from Lux Holdups, purchased on Etsy. It is an acrylic rod with brass rings and end caps. I love how chic it turned out.
 
 
CHAIR FABRIC
Um, hello, this is sensational! This Bixi Velvet from Schumacher is what dreams are made of. I want to use it all over my house. :::orders 20 more yards immediately::: It was a little bit of a challenge to work with on the seats because it was thick near the corners and the folds, but with tight pulls I was able to make it work.
 
 
DIY
The first DIY project I tackled was the bamboo trim on the ceiling. This was a pretty arduous job but I really wanted to do it. I ordered the pieces from a lumber yard upstate New York, and when they arrived I immediately hand painted them to match the wallpaper. I spent hours applying the PL and adhering them to the ceiling. My neck hurts right now, as I recall all those hours looking up and doing the work.
 
Then I decided to reupholster the chairs myself. I ordinarily would not take this approach with such expensive fabric but I had faith in myself. It couldn't have worked out better and I saved myself at least a few hundred dollars.
 
I also painted the mirror with Rub n Buff. This was not a complicated DIY but nevertheless it was one that needed to get done. I had to cut the red sheen out of it by painting it more of a gilded gold.
I also created this custom tray top with the leftover fabric from the chairs. It was just a nice way to tie it into the rest of the space. I had a glass piece made to fit on top and I stapled the fabric to a board/backing. This creates a fun bar area, with a little pizazz.
 
 
LIGHTING
The chandelier was the real jewelry of the space. It was first item that really changed the room. I looked at about 100 chandeliers for this room. I was so particular about not only finding one that was the right scale, but also finding one that fit the vibe. I wanted traditional but I didn't want stuffy. The Visual Comfort chandelier had a little bit of spunk because of the lines, but overall it read traditional. I am so thrilled with it. I purchased small, navy shades for it, thinking it would add to the space, and in the end I cut them out of the plan and just let the chandelier tell it's own story.
Also from Visual Comfort were the two buffet lamps on the sideboard. I loved them for a couple of reasons. One is that they complimented the chandelier without competing with it. And two, it was the exact size I wanted. Slim and delicate.
 
 
RUG
I had gone to Stark Carpet with something very specific in mind. I wanted a neutral sisal rug, something that would balance out the boldness of the paper. And I ended up leaving with a sensational rug in a soft mint green/blue color and totally blowing the budget because it went with the fabric perfectly! I can't say I regret that move but as they say, "Buy Once, Cry Once!" so that's what I did. And in case anybody is wondering, there is nothing, I mean nothing, like walking on a brand new rug after walking on Indoor Outdoor carpets for years!
 
 
SIDEBOARD
The sideboard was purchased on consignment about a month before the challenge began. I got a great deal on it, and knew that if I was going to redo the dining room-it would fit in perfectly no matter what the mood board was going to look like.
 
 
THE TABLE
The table was the only thing we kept from the previous dining room. I would love to one day find the right table, but I wasn't going to rush the process for the sake of this challenge. For now, the current table works just fine.
 
ACCESSORIES
Some of the accessories on the table are purchased on consignment, and some are from The Enchanted Home. The small dish and porcelain box on the sideboard were my grandmother's.
 
 
WALL ART + SCONCES
The bird art pieces are vintage pieces from my Grandparents home. The frames are mirrored and they could probably use new matting but I can't let go. The vintage prints really grounded the space. And they are so special to me.
 
This was one of the longer walls in the dining room, however I did not feel the need to decorate every wall with art. I wanted the wallpaper to, at times, be the art. And did not want to hide it at every opportunity.
 
 
The wall candelabra was an Etsy purchase. I loved the scale and it's whimsical presence. I surrounded it with a few plates, from Royal Copenhagen, purchased used on Ebay. Great price, best decision!
 
 
The plate sconces were purchased used from Facebook Marketplace. They are just the right color and size.
 
 
DETAILS
I am a big fan of details, and in fact no space is complete without them. I included this blue tassel that I ordered from Etsy. It came all the way over from Italy so I had to order it early. I added taupe tassels to the two end chairs to start to bring out some more neutrals. I also used the dragon doorstop which was my parents. It is a nod to the Bixi Velvet fabric on the chairs, both have whimsical dragons!
 
For your enjoyment, here are some photos of the BEFORE. I am so pleased with the transformation, and I hope you agree! Thank you for reading along and for following this journey with me. Maybe I will do another One Room Challenge in the spring. What do you think?
 
~FIN~


PREVIOUS POST
One Room Challenge, Pending Reveal
Welcome to part 1 of 2 parts of my final reveal for the One Room Challenge. In other words, 7 weeks was not enough time for me to complete this space. And that's ok! I have curated every aspect of this room and I am hopeful it will pay off in the end, even if I need a bit more time.
 
My chairs came in and I was able to upholster the seats. I was so nervous to cut the beautiful Schumacher fabric but after the first chair, I started to get the hang of it. It was thick, which was a challenge, but I ultimately prevailed after a lot of tight pulls. And now I want to upholster any and everything. It was so fun! And rewarding. I think it may deserve a tangling tassel!
The chandelier went up, and it looks fabulous. I ordered some little navy shades for it, and we'll see how they look. I'm 50/50 on that look, only because the lines of the chandelier are so strong. Could either be a nice balance, or take away from it.
I found a beautiful mirror for a great price, to go above the buffet. For some reason it had a little bit of a red hue to it so I tackled another DIY this week and used Rub n Buff to bring more yellow gold out. Now it will compliment the buffet lamps nicely.
The wallpaper finally came in and I am awaiting the professionals to put it up. Tick tock! And there are other little details I have yet to share because they can't go up until the wallpaper is complete. I will leave the rest to the final reveal, in hopefully about 10 days! And I will update the post one more time!
 
Thank you for reading...I'm very excited for my next post to be the final transformation. If you want to see the other Better Homes & Gardens One Room Challenge reveals, click here!
 
Continue reading

One Room Challenge, Week 5

One Room Challenge, Week 5
Happy to report that even though things are slow, they are starting to come along. Fortunately, the One Room Challenge has given us an extension so I am relieved. It will still be cutting things close but the extension has relieved some pressure. The industry is still suffering shipping delays due to COVID and so many items are backordered. Not only is this frustrating for me for this particular ORC project, but it is also frustrating for my work. Thankfully, my clients are all so wonderful and understanding!
The fabric for my chairs arrived and it is heavenly! Can you stand it? It is a velvet dragon that brings out the two blues in the wall covering. It also adds a touch of tan that I will incorporate somewhere else in the room. I will have some small scraps leftover after this project (I think) and would love to use them for the chandelier shades. It will depend on the particular shades and the scale of the pattern. The fabric is really beautiful and I'm ready to use it EVERYWHERE! (kidding...). Special thanks to F Schumacher and Sandra Prendergast, I am so honored to be partnering with them for this project.
My chandelier also arrived and I am waiting for the installation. It does not have shades but I am considering adding them. I am not sure the design of the chandelier lends itself to shades but I will have to access that once it is hung. I hope it looks great with the bamboo trim I put up. Fingers crossed!
The rug I showed you last week will hopefully arrive next week. The rug alone will brighten the space up since we don't get much light in there.
 
As for the bar cabinet idea, it didn't go over well with my other half. Between the potential work involved and the short time frame given, it might have been a headache. For now, I have moved on from the idea and purchased a really cool (and affordable!) bar cart. The bar cart will undergo minor alterations to be more customized for this room. It comes over the weekend, and I am excited to show you the plan.
 
I have decided to forgo the sideboard. This decision weighed heavily on me considering it was a big part of the package deal for this space. Since the wallpaper will be last for this project (sigh) it was really hard for me to envision this piece of furniture in the "future" room. Maybe down the road I will find one but for now I will use an antique sideboard that I already have, which I originally purchased for the dining room pre ORC. For this room, there has to be a little give and take considering cost and time. I am happy to report that the space does have high and low elements. I splurge where it counted, and saved where nobody would notice. That's a win!
 
Until next week, thanks for reading and cheering me on!
-Chrissie
 
PS Find other One Room Challengers here!
 
Continue reading

One Room Challenge, Week 4!

One Room Challenge, Week 4!
This has been the most challenging week. If you have ever tried to complete a space in 6 weeks, it's hard! Anything custom takes time. Deliveries, especially freight, take time. And sourcing items takes time. If it isn't ordered by now-it's simply not arriving on time. This challenge has been a delicate balance of ordering what I need in order to get it finished but also not ordering things that I don't absolutely love just for the sake of finishing. At the end of the day, this is supposed to be fun-albeit challenging-but more so, this is a home I am living in. After the reveal, it's here to stay.
 
I had many challenges and set backs this week. Some of which are unresolved still. I got word today that the Loop Dining chairs I ordered were going to cost more than originally estimated to ship and simply wouldn't make sense financially. I canceled the order and I'm back to square one looking for chairs. I found another set that I loved even more, but they are on back order until January. The search continues...
 
 
The second challenge is that the wall covering I ordered has an extremely large pattern repeat and the wallpaper installer felt he wouldn't have enough of the pattern to provide the appropriate trim. We would be forced to waste the paper and then not have enough for the project. I had to double the wallpaper order, and believe me it was a tough pill to swallow. I wanted so badly to change the paper-but you love what you love.
 
The good news is that the drapes are being sewn and will be on time. The chandelier arrived today, and the rug is being cut as I type this. I am starting to think some things may come together and some not. And that is okay.
 
 
I have been on the hunt for a bar cabinet that I can refurbish. I think I found one, but have not pulled the trigger yet. That will be a project for this upcoming week! Considering I will have extra paper, it may be a wise way to repurpose it. And I love getting creative!
 
This next week will be a big one! Until then, my friends!
 
-Chrissie
 
PS You can find other One Room Challengers here!
 
Continue reading

One Room Challenge, Week 3!

One Room Challenge, Week 3!
While I wait for some items to arrive, I decided this week would be a good time to paint the bamboo and get it up on the ceiling. I am waiting on some items to be delivered so I had time to kill.
 
I chose a light blue for the bamboo. I really (really!) wanted to do navy but was afraid that it would be too dark once the wall covering goes up. Since the wallpaper will be last, I am praying that the color compliments it. If not, I will have to paint the pieces already adhered to the ceiling.
 
Below is the wallpaper from Schumacher called "Feather Bloom". It has a large pattern repeat and is made of grasscloth. It's traditional but definitely has some spunk. I am SO excited for it, but it will be what feels like a long wait for it. Thankfully my installer very forgiving and will be on call for me whatever it arrives. It will need to be put up instantly as it will be the final week of the challenge. And maybe the final day. GULP! Schumacher has been an absolute dream to work with and I am still so honored to be partnering with them on this DREAM project of mine. I am grateful.
Back to the job at hand...I purchased a hand held miter saw to get the corner angles. I can tell you that if I had an electric saw it would have been MUCH easier. But the hand saw did the job and maybe it was a right of passage for this project.
I then used Liquid Nails ("PL") to adhere the bamboo to the ceiling. I also wanted to tack the pieces up there with skinny nails while the glue dried but when I realized that I was hitting steel, I decided to forgo tacking them up there and just use the PL. Since the pieces are light enough, I used painters tape to hold them up until they cured. NOTE: PL is really messy. Works like a charm but it's kind of a nightmare! Also, looking up and working on the ceiling...also a nightmare :)
The project took me two days, with a lot of breaks. My neck is surprisingly intact, and I'm still walking upright. I think it came out awesome-I will give you a sneak peek but you will have to wait for the final reveal to see it all!
My chandelier was ordered and is on the way! As well as the drapery rod. I am working on exactly what my drapes will be but I will likely choose something neutral. The room does not get a lot of light and the goal was really to brighten the space up. I'm thinking ivory with a blue trim.
 
The hunt continues for a bar cabinet. Would love something vintage with a story or history-but time is of the essence. I am choosing to have a little patience, over execution on this one. Trusting the process and praying to find something just in the nick of time. I really wanted the room to be perfectly curated for my family and me, as opposed to a cookie cutter space that anyone could emulate. The tricky part is the timing. But I have faith! And I am so excited to see it all come together. It will surely be the best part of this process.
 
To see what other One Room Challengers are up to, find the info here.
 
Until Week 4...tick tock!
 
-Chrissie
 
Continue reading

One Room Challenge, Dining Room (week 2)

One Room Challenge, Dining Room (week 2)
I guess this is when I start to get anxious and feel like I may not get this done on time. But even with that uncertainty looming over my head, some really fun things happened this week and they are keeping my creative brain afloat.
 
My plan is to apply bamboo trim to the ceiling. So my first order of business while I wait for furniture to arrive was to measure and tape the design. I decided that because the wall covering is a bit busy, I will keep the bamboo trim as a rectangle. No twists and turns. Thankfully, and to my sheer surprise, the bamboo trim came in early. It was in my hands, from a lumbar yard in upstate New York, within a matter of 3 days.
Because the wallpaper won't arrive for probably 4 1/2 weeks (eeks!) I will have to paint and apply the trim before it goes up. I am going to take a risk on the color and hope it works out. If it doesn't work, I will have to repaint the trim after it has already been nailed and glued to the ceiling. Not horrible, but I wanted to wait for the wallpaper to go up to decide.
 
I decided upon cane back white chairs with neutral cushions. And this week I had the honor of partnering with F. Schumacher on this project. I'm still speechless. My hope is to reupholster the seats of the end chairs with their Bixi velvet fabric.
 
Lastly, I am getting the drapery in order. These unbelievable lucite drapery rods are coming my way from Brooklyn, New York. And while I really want to add drapes with a pattern, I just can't find ones that sing to me with the Feather Bloom wall covering. So I will choose neutral drapes with a fun tape trim. That's to be decided ASAP!
 
And I am loving having most of my products sourced from not only the USA but from New York. It gives me a tremendous amount of joy! It's the little things.
 
Onto the next week, friends! Thanks for reading. Visit my Instagram account for more and check out other great designers taking on this challenge here.
 
-Chrissie xo


Continue reading